Favourite Mani/Pedi Combinations

It’s this time of year again, mani/pedi season is among us!!!

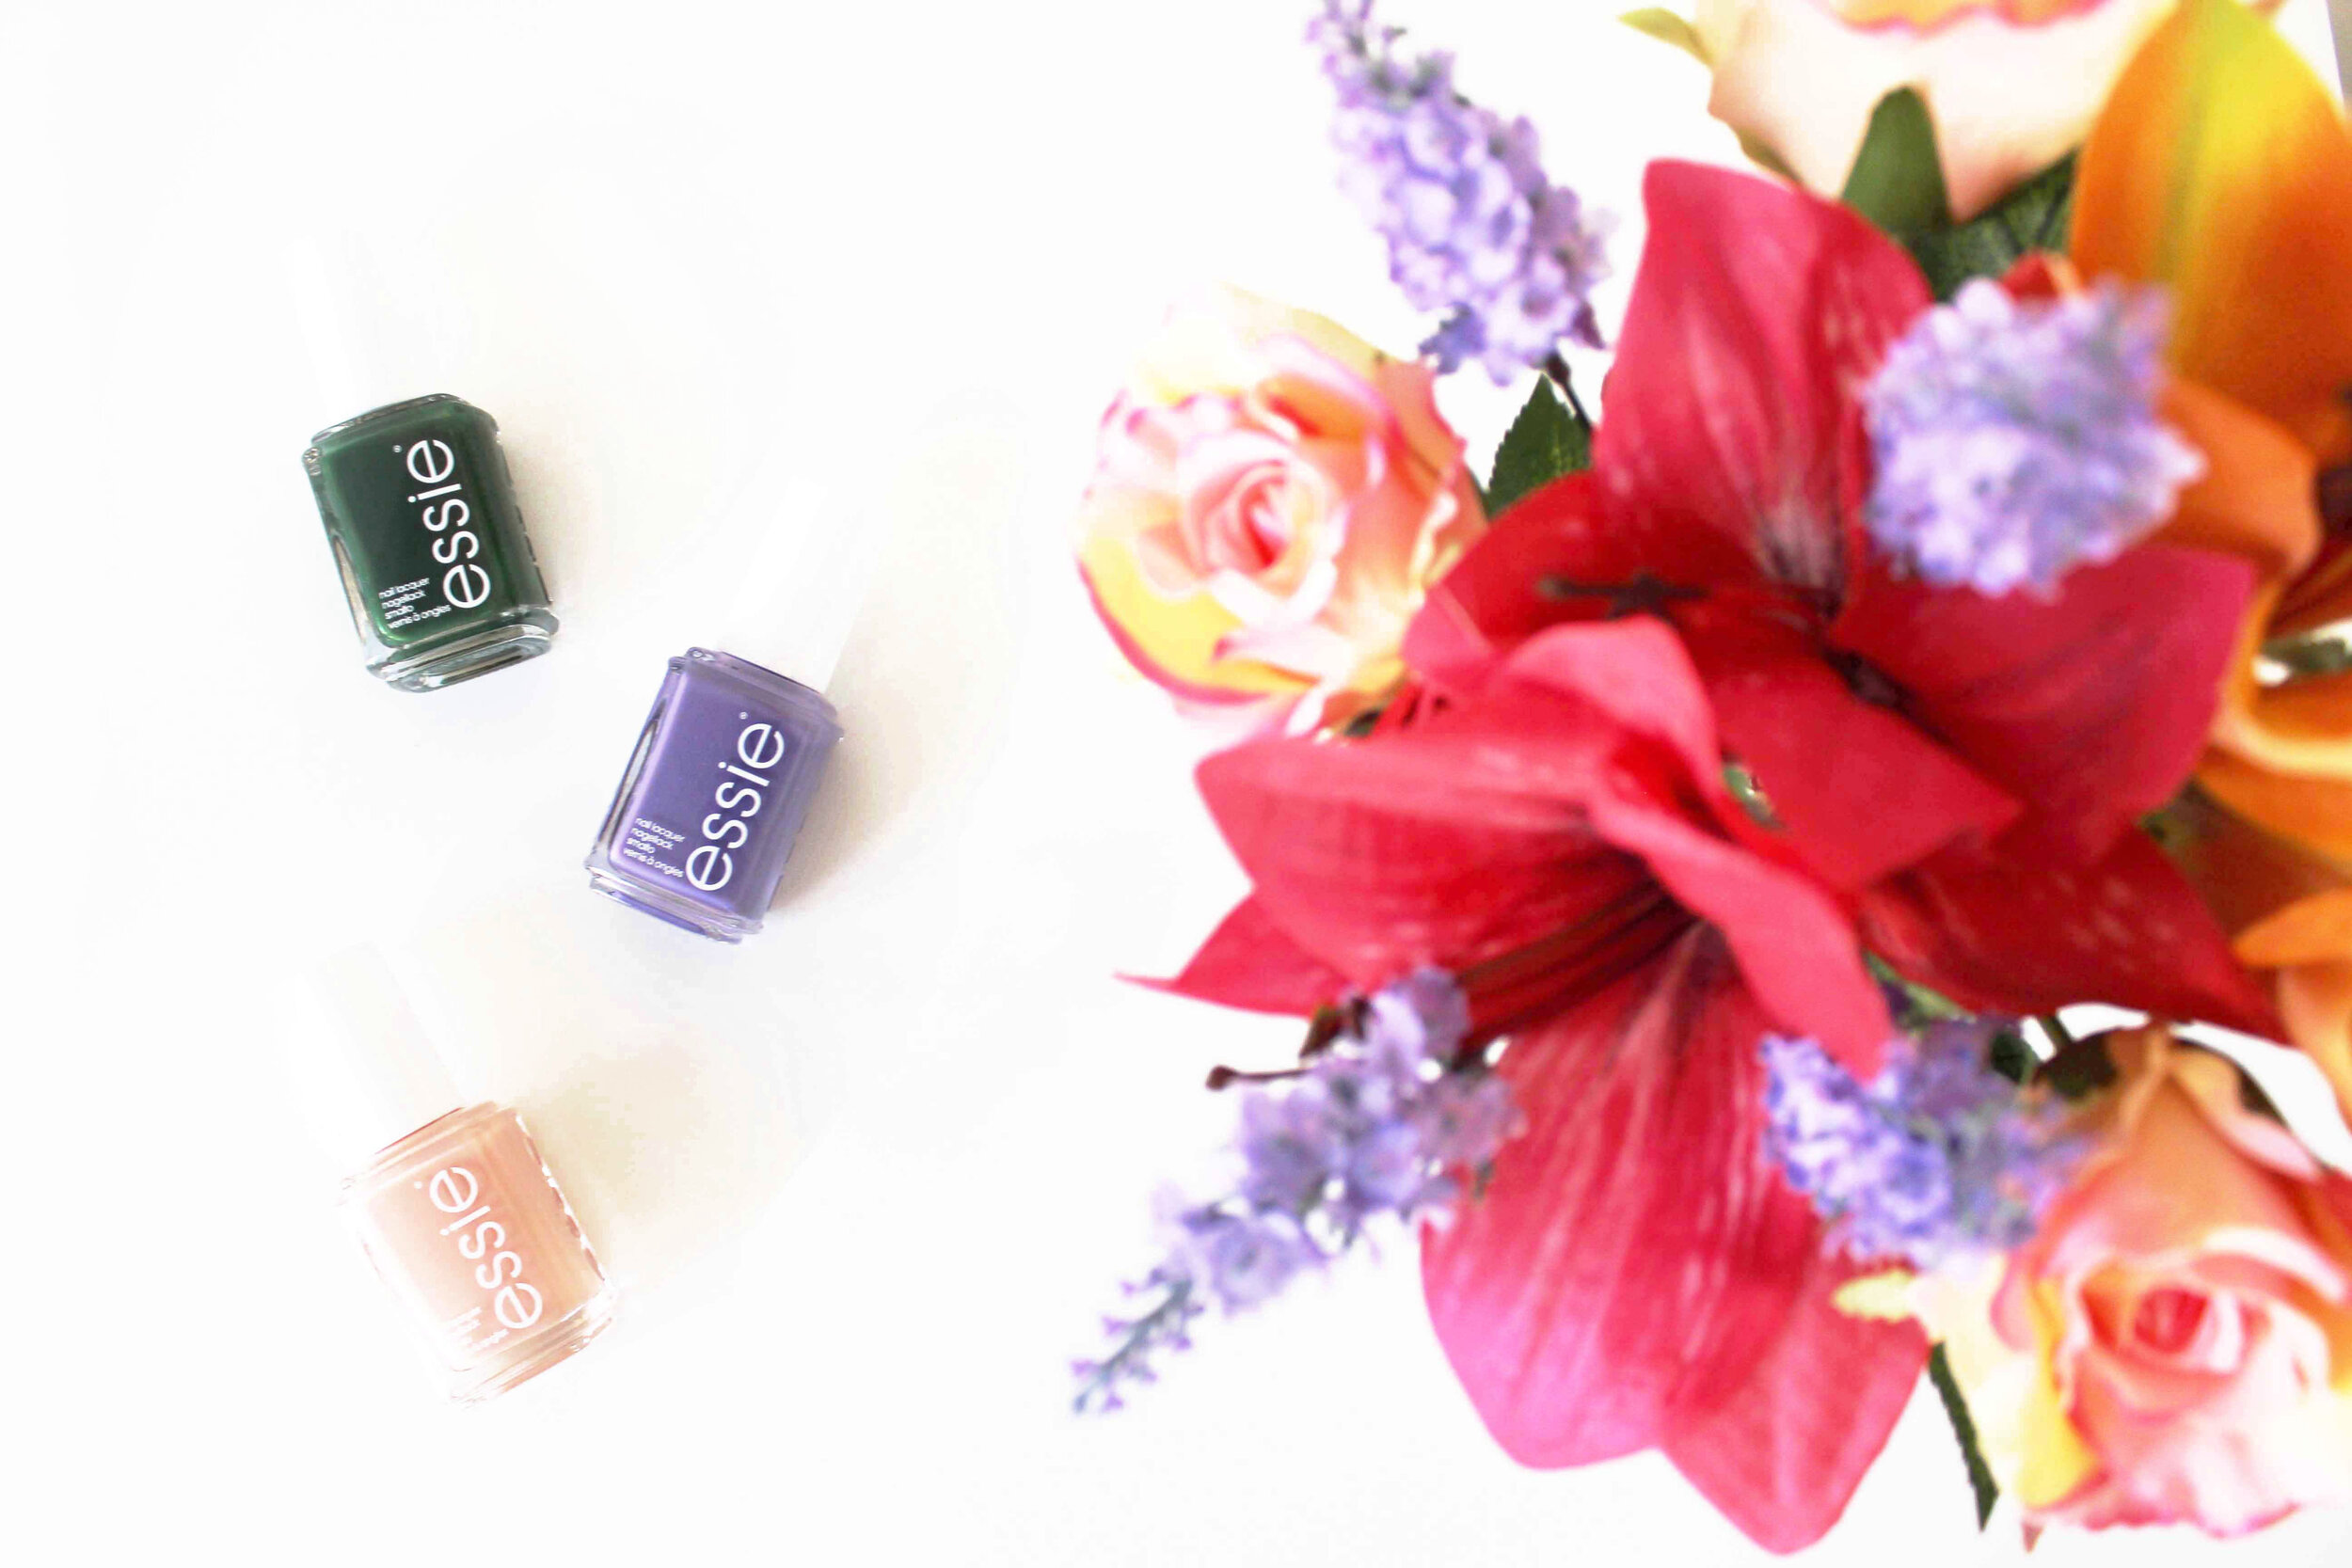
Now that our toes are out again, I thought I’d share with you my favourite nail polish combos that I tend to gravitate towards this time of year. Of course, I’ve only picked from my Essie collection as those are the nail polishes that last for me the longest chip-free, but any brand will do.

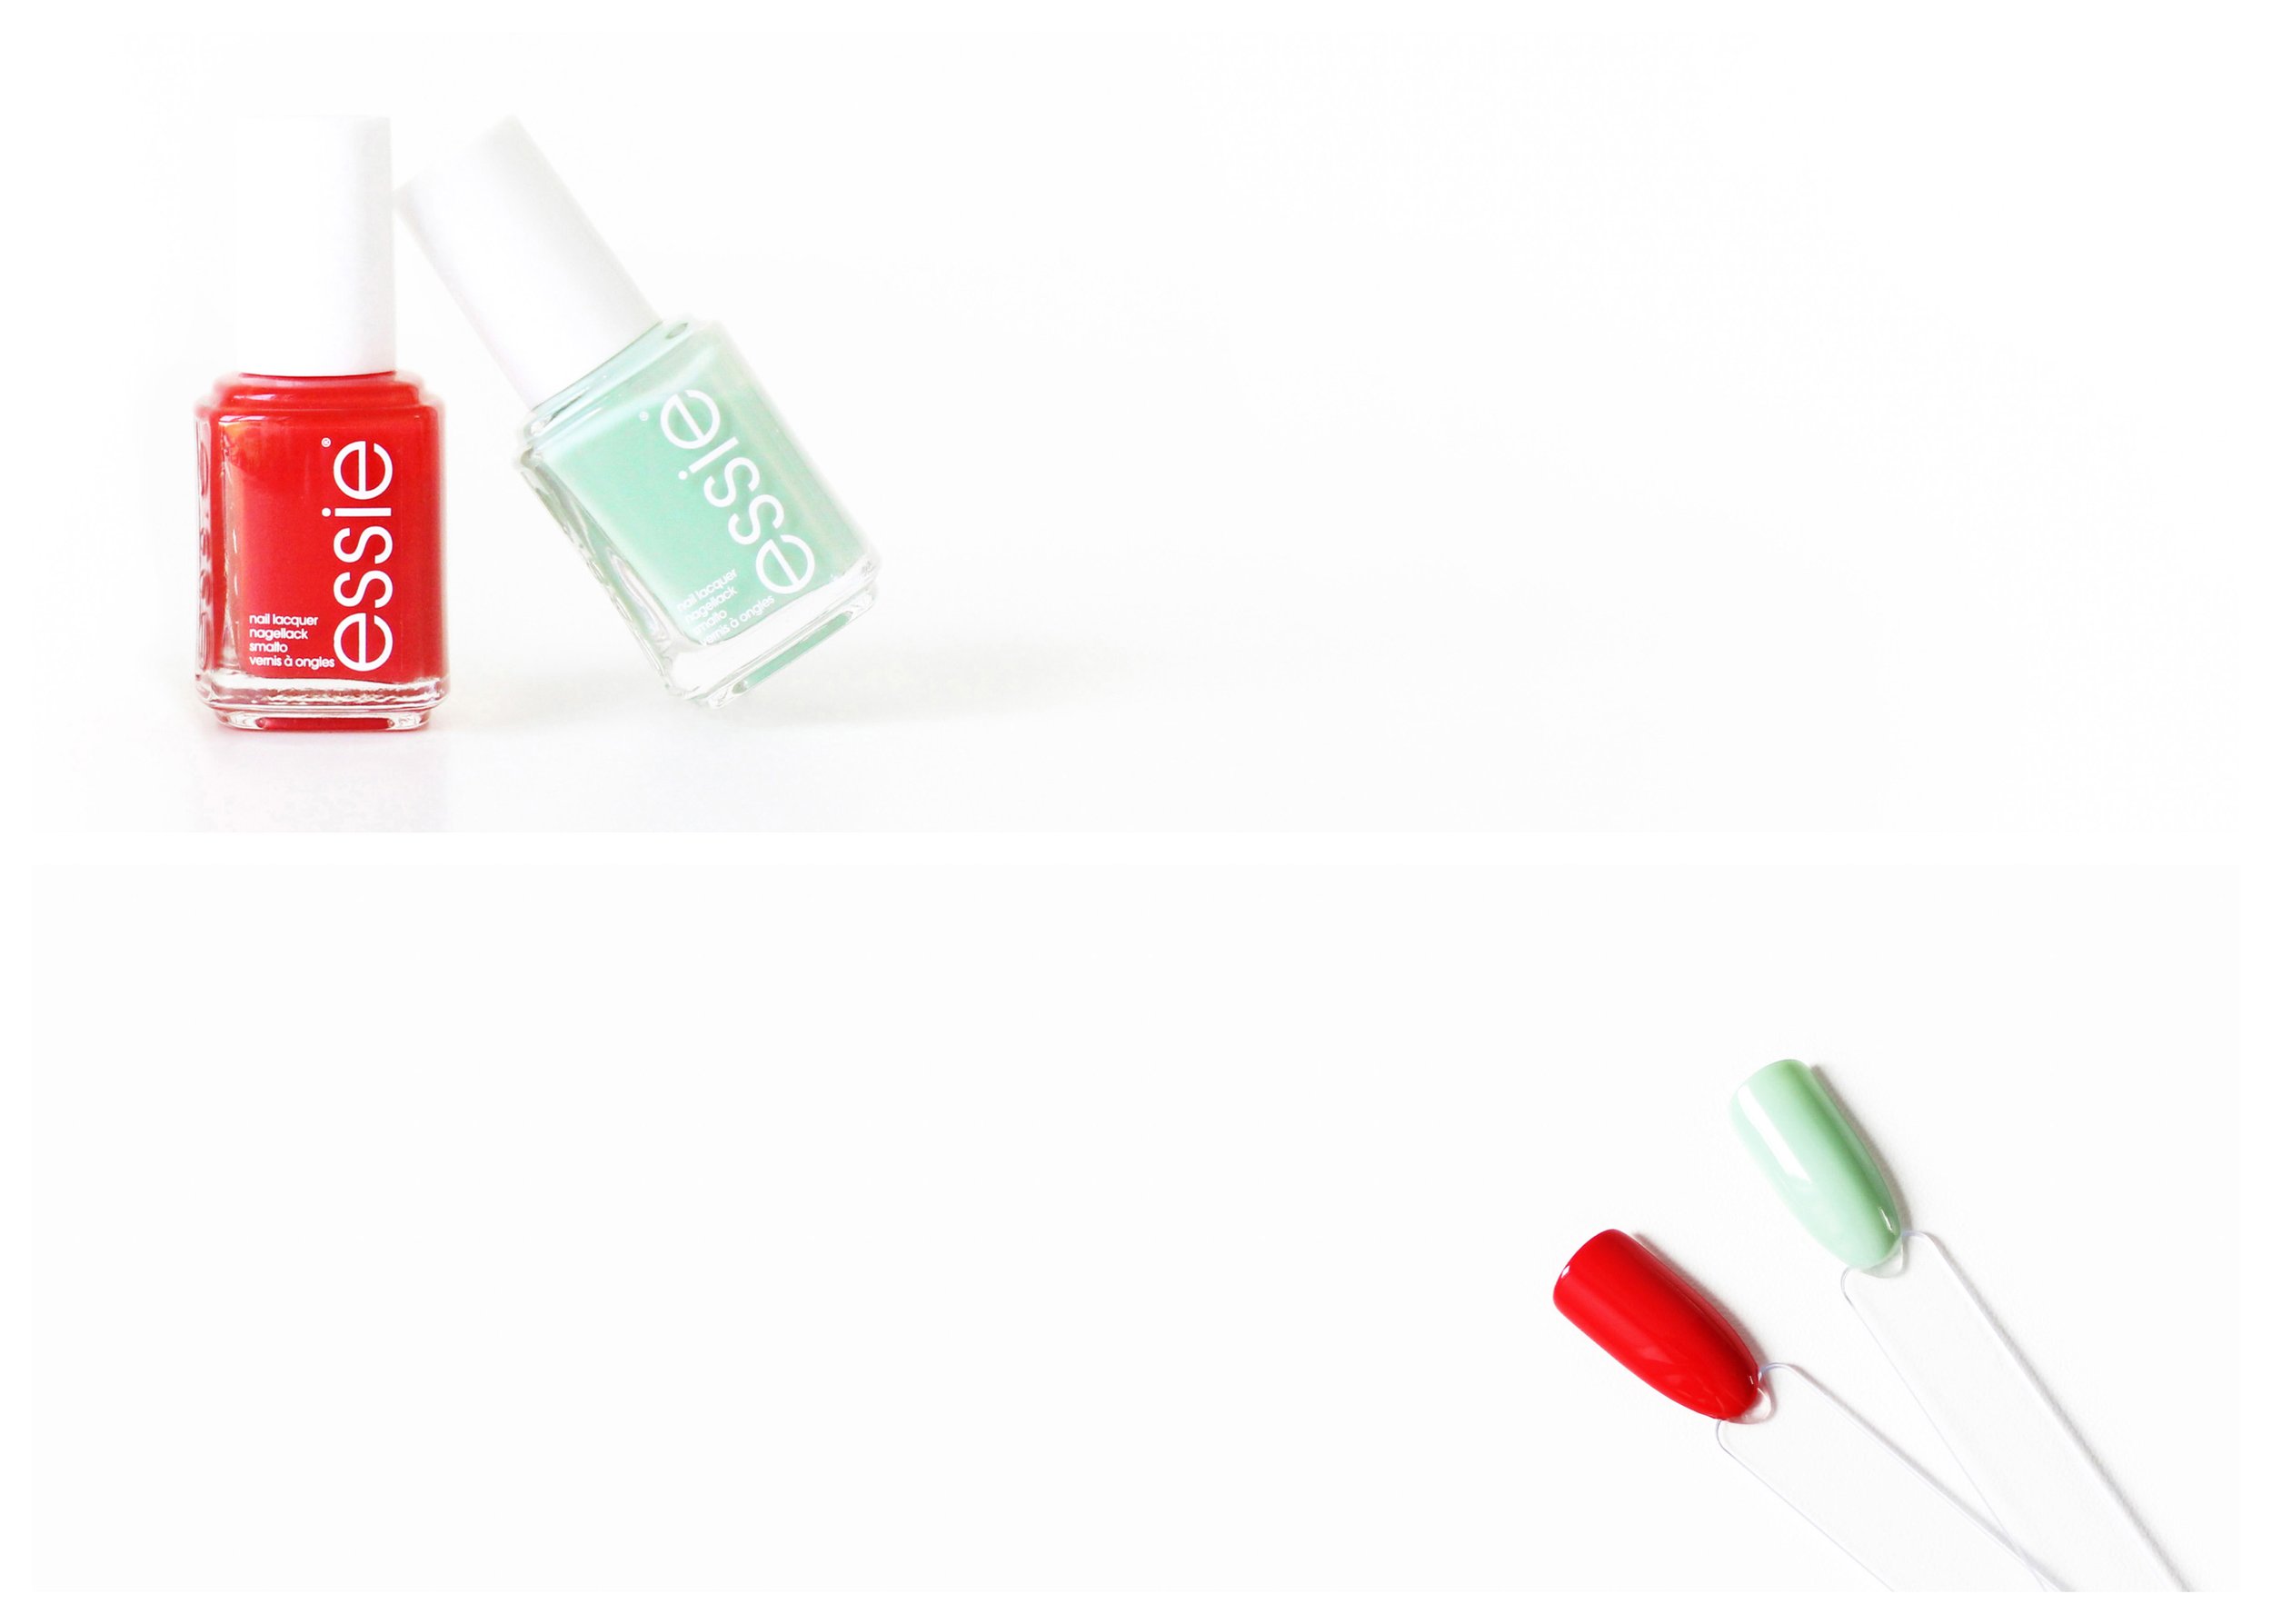
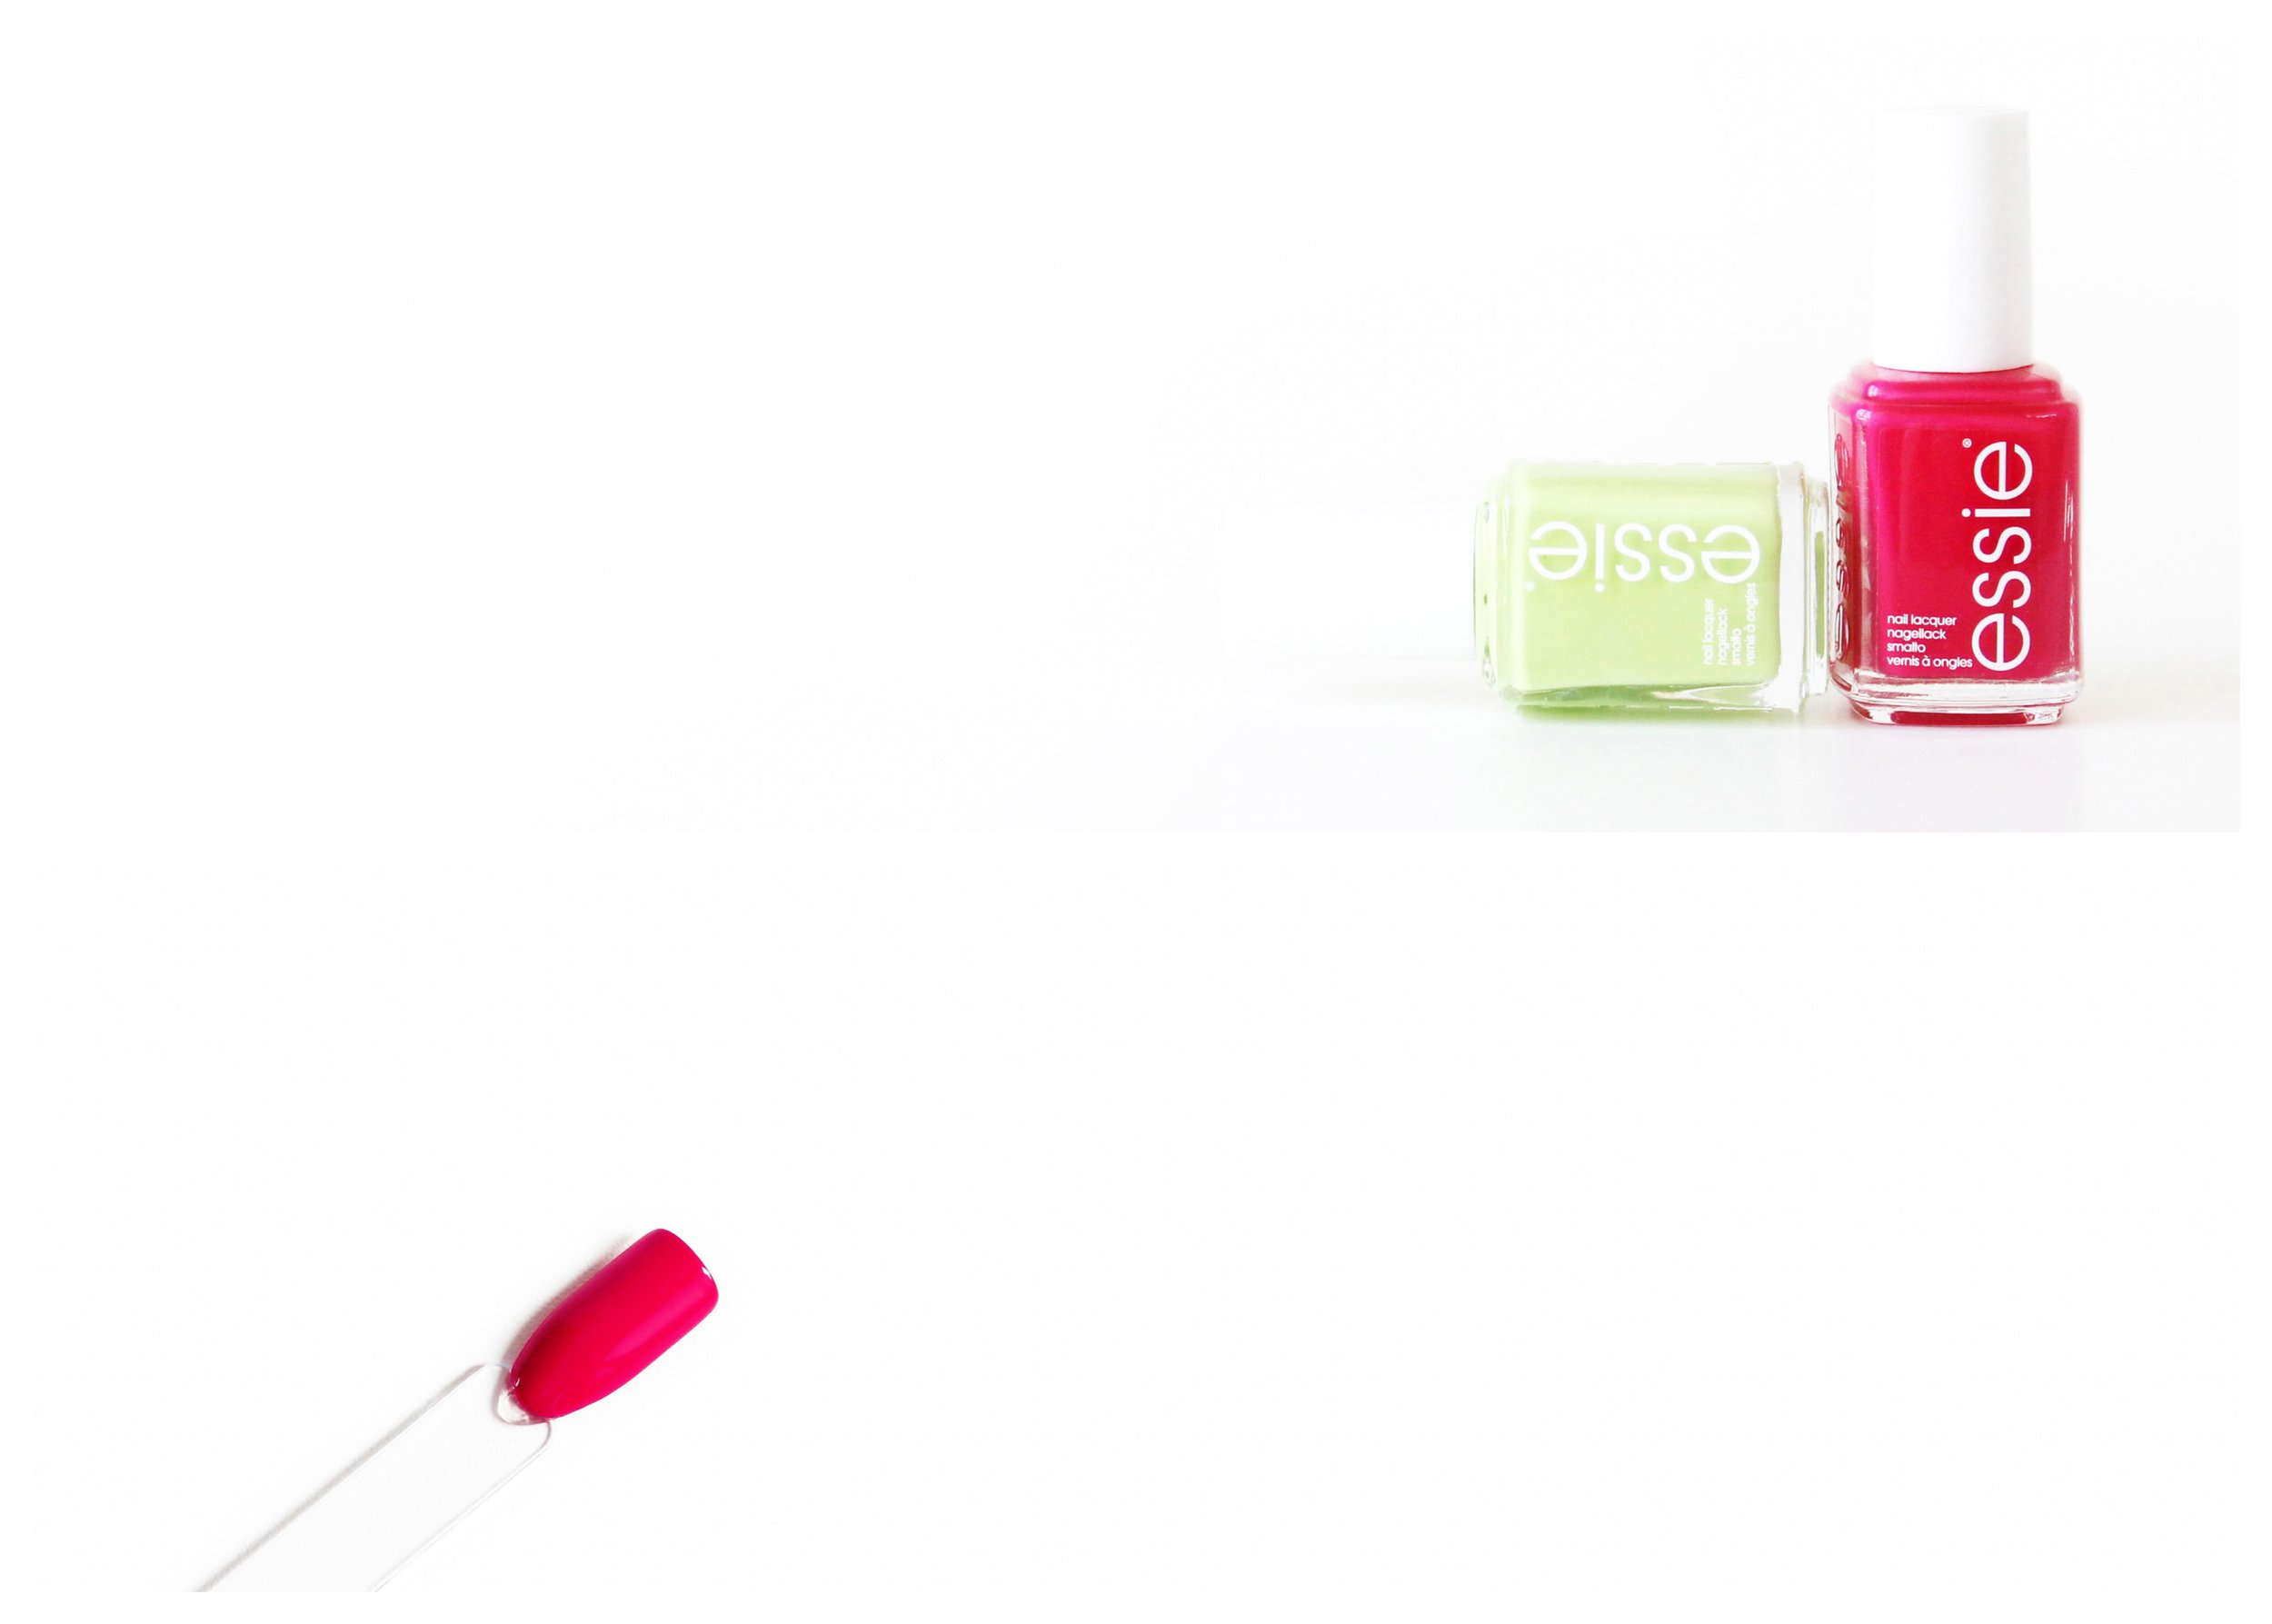
First up, mint and red. I’m wearing Essie’s Turquoise & Caicos (mint) on my nails and Fifth Avenue (red) on my toes.

As a side note, all these colour combinations can be switched between the nails on the hands or toes, it doesn’t really matter as long as they are worn together they will look good!

This is what I like to call my “vintage” combination. For some reason this particular combo makes me think of 1950s fashion (even though mint nail polish for sure didn’t exist back then). It has me thinking of 50s swing dresses in fun pastels and polka dots.

New Look White Sandals

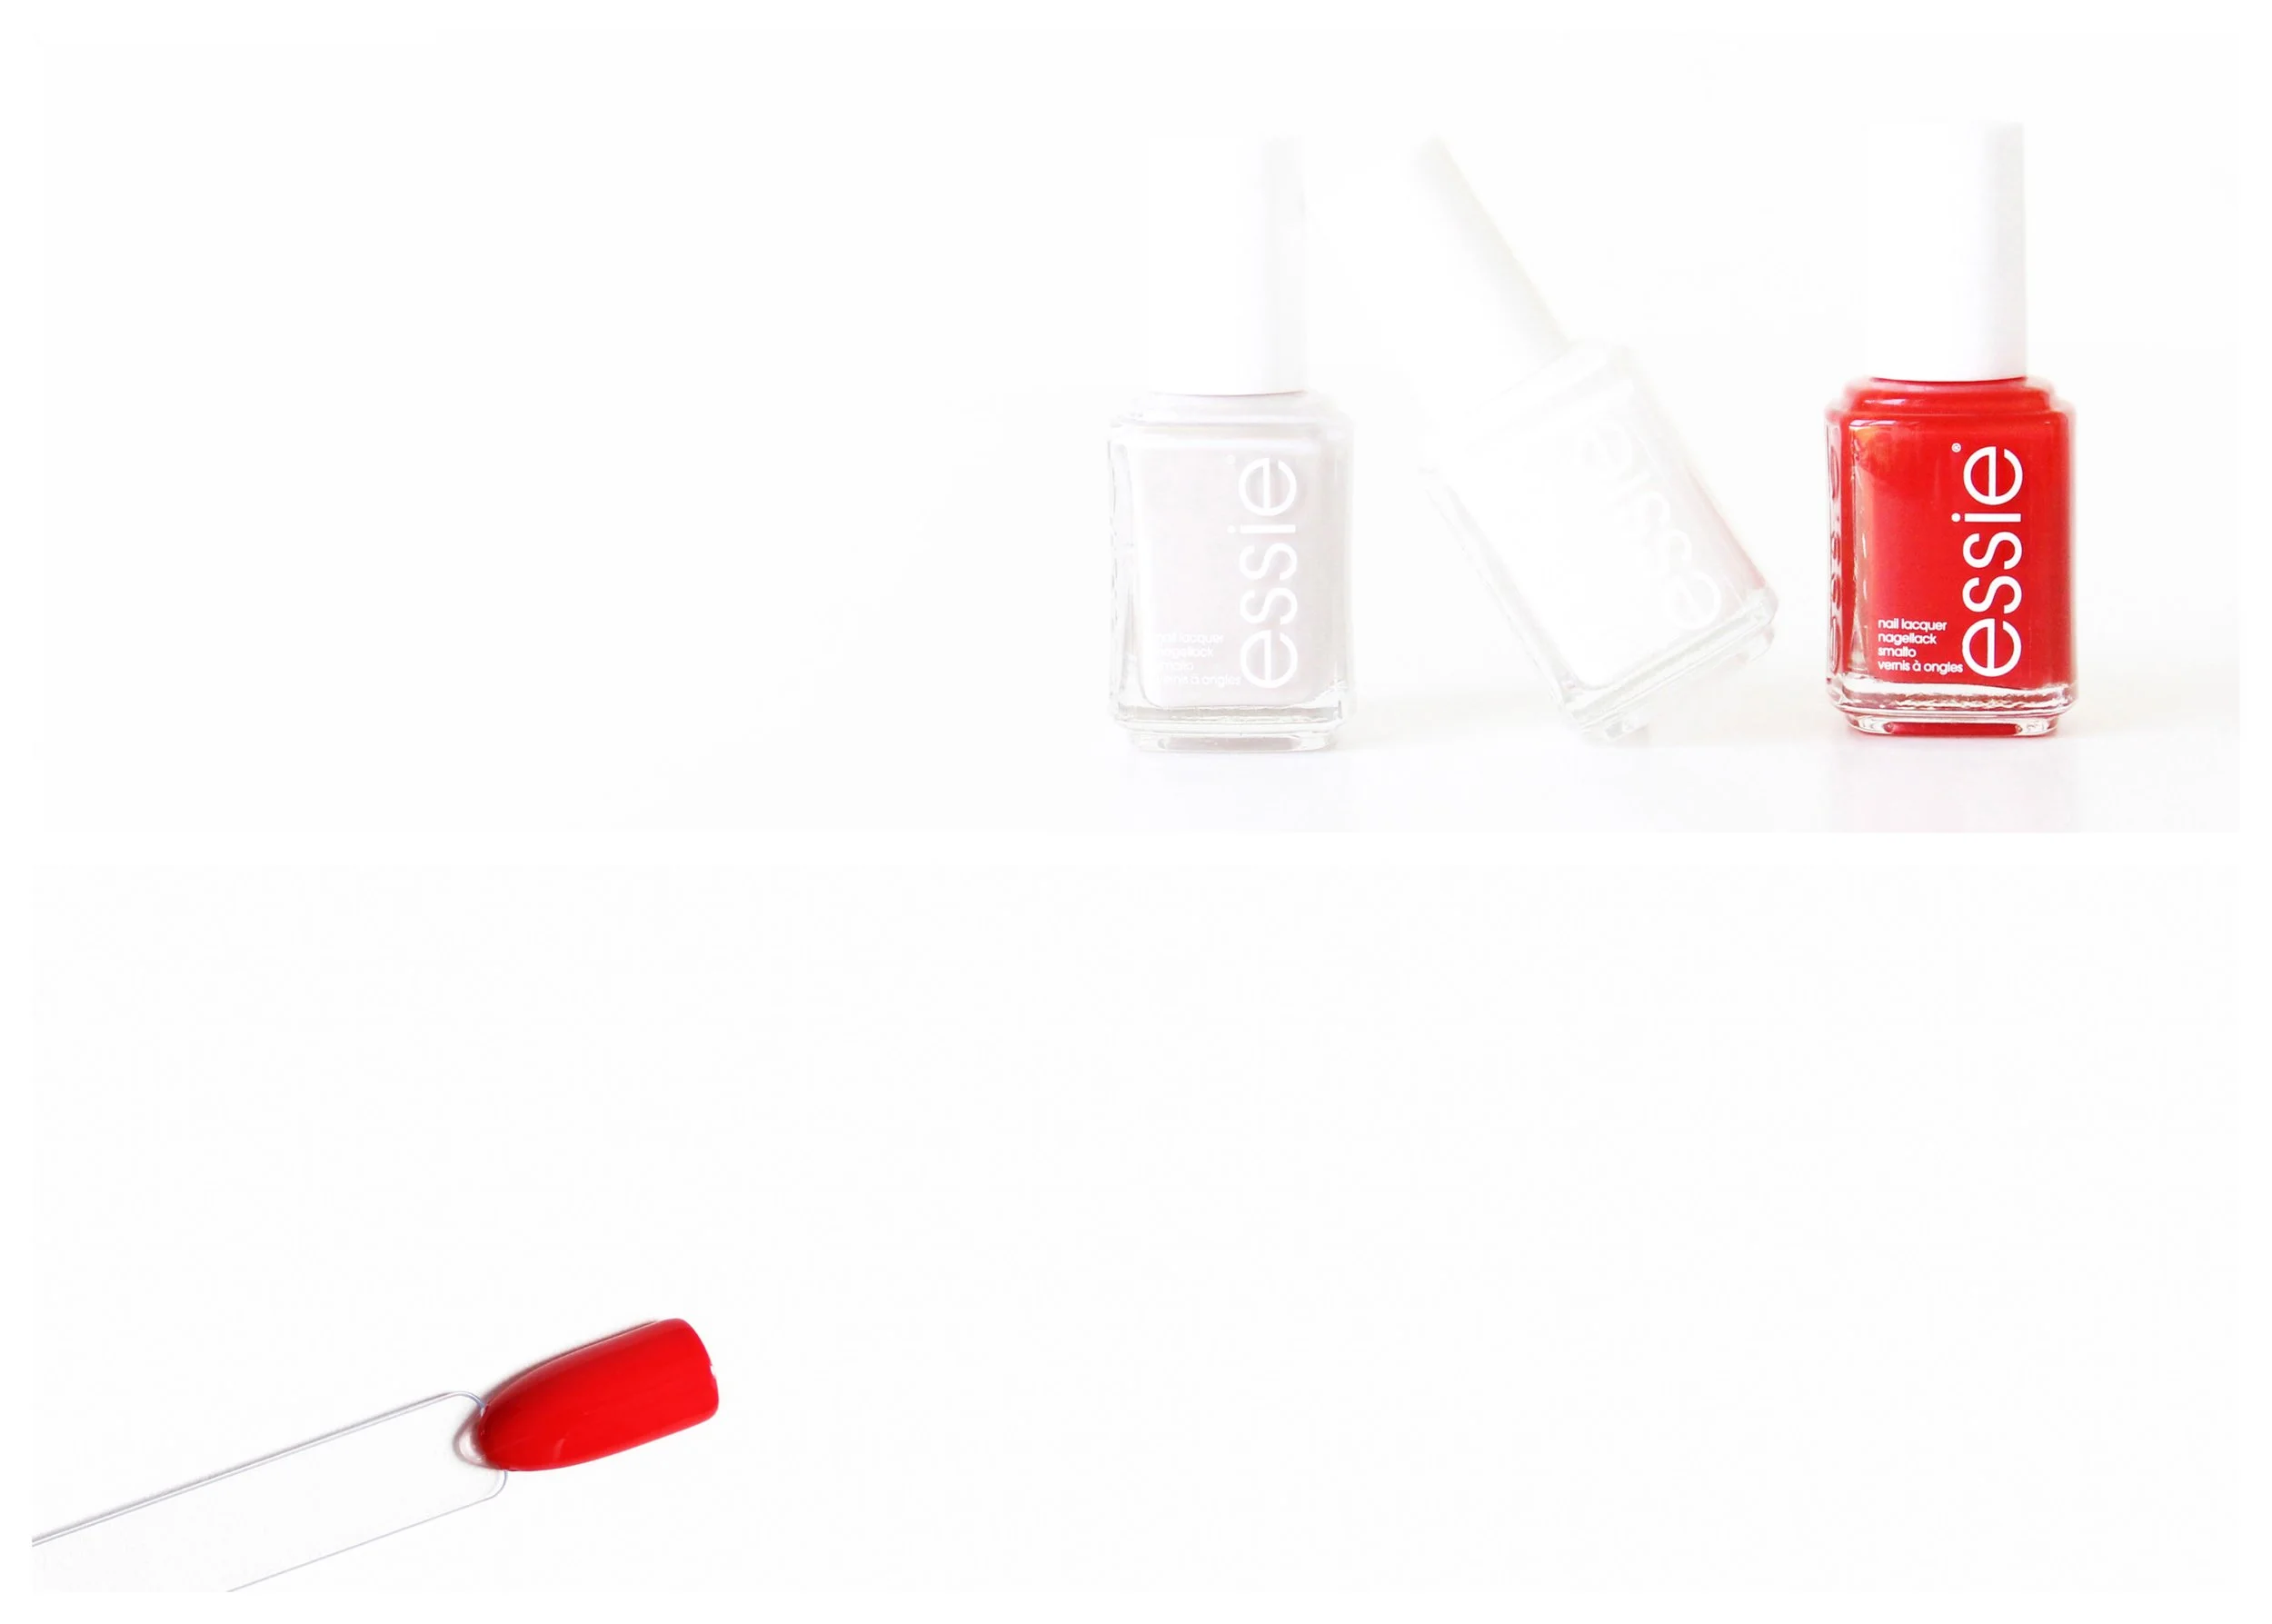
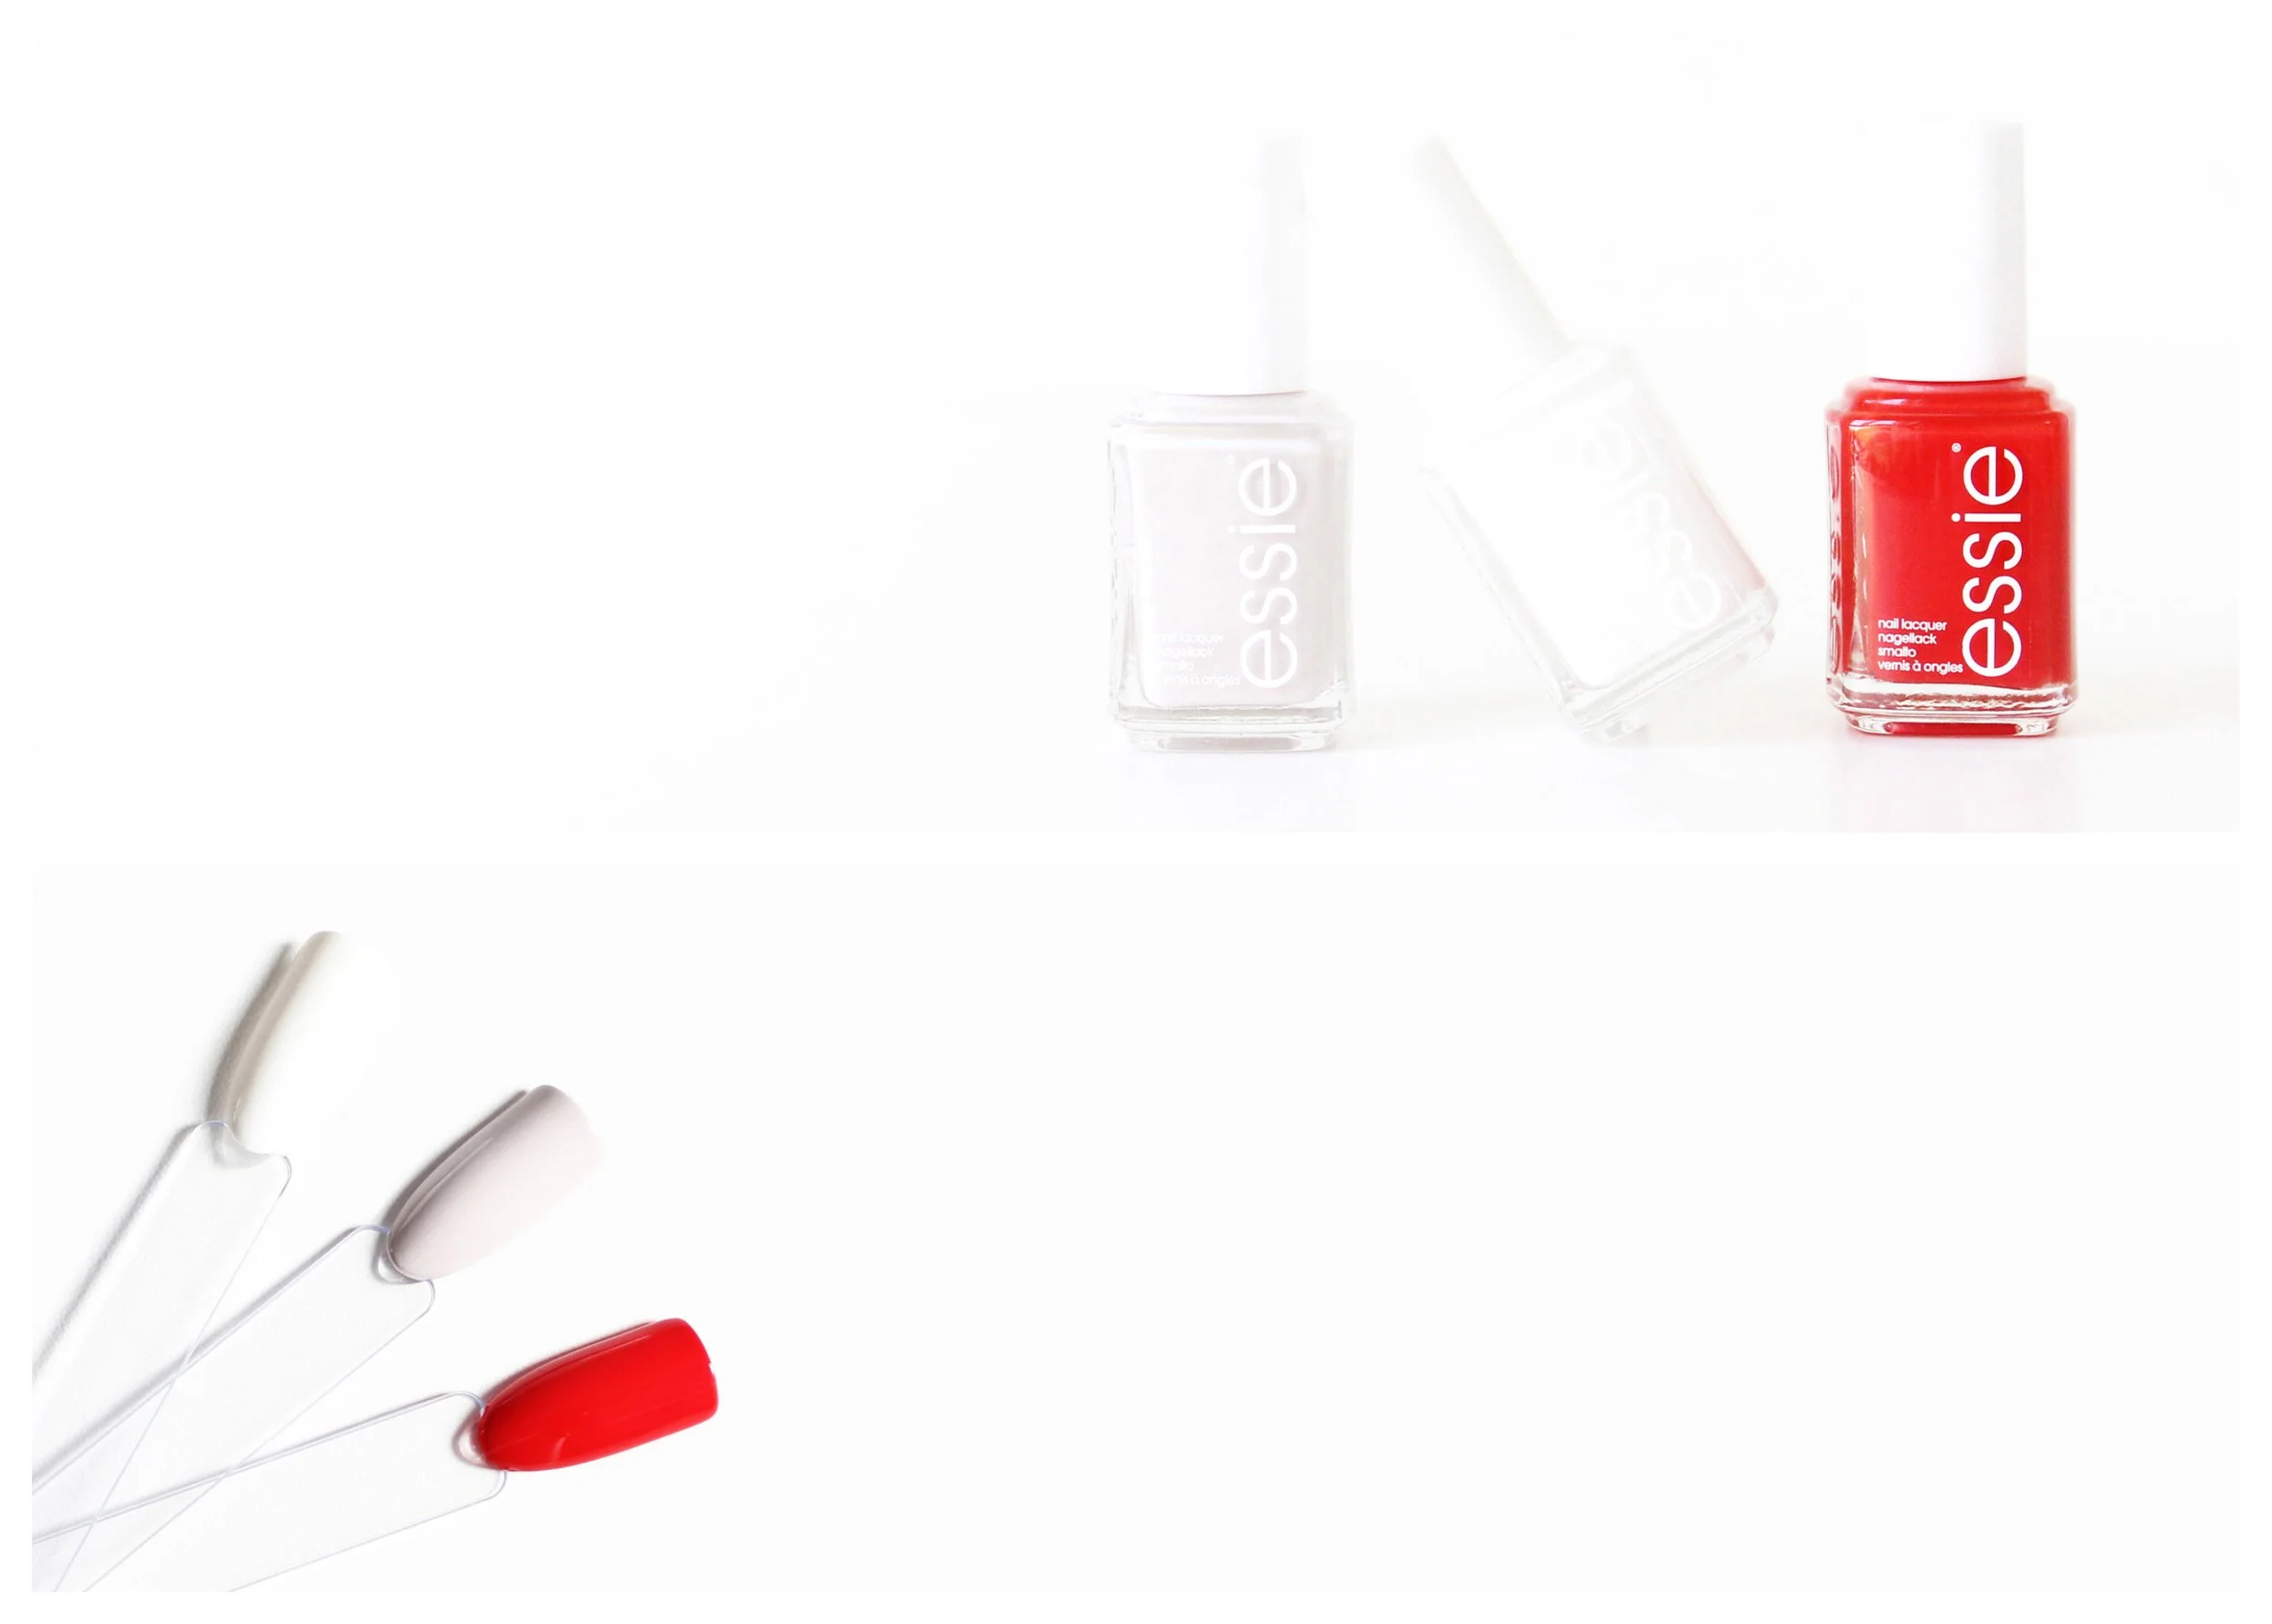
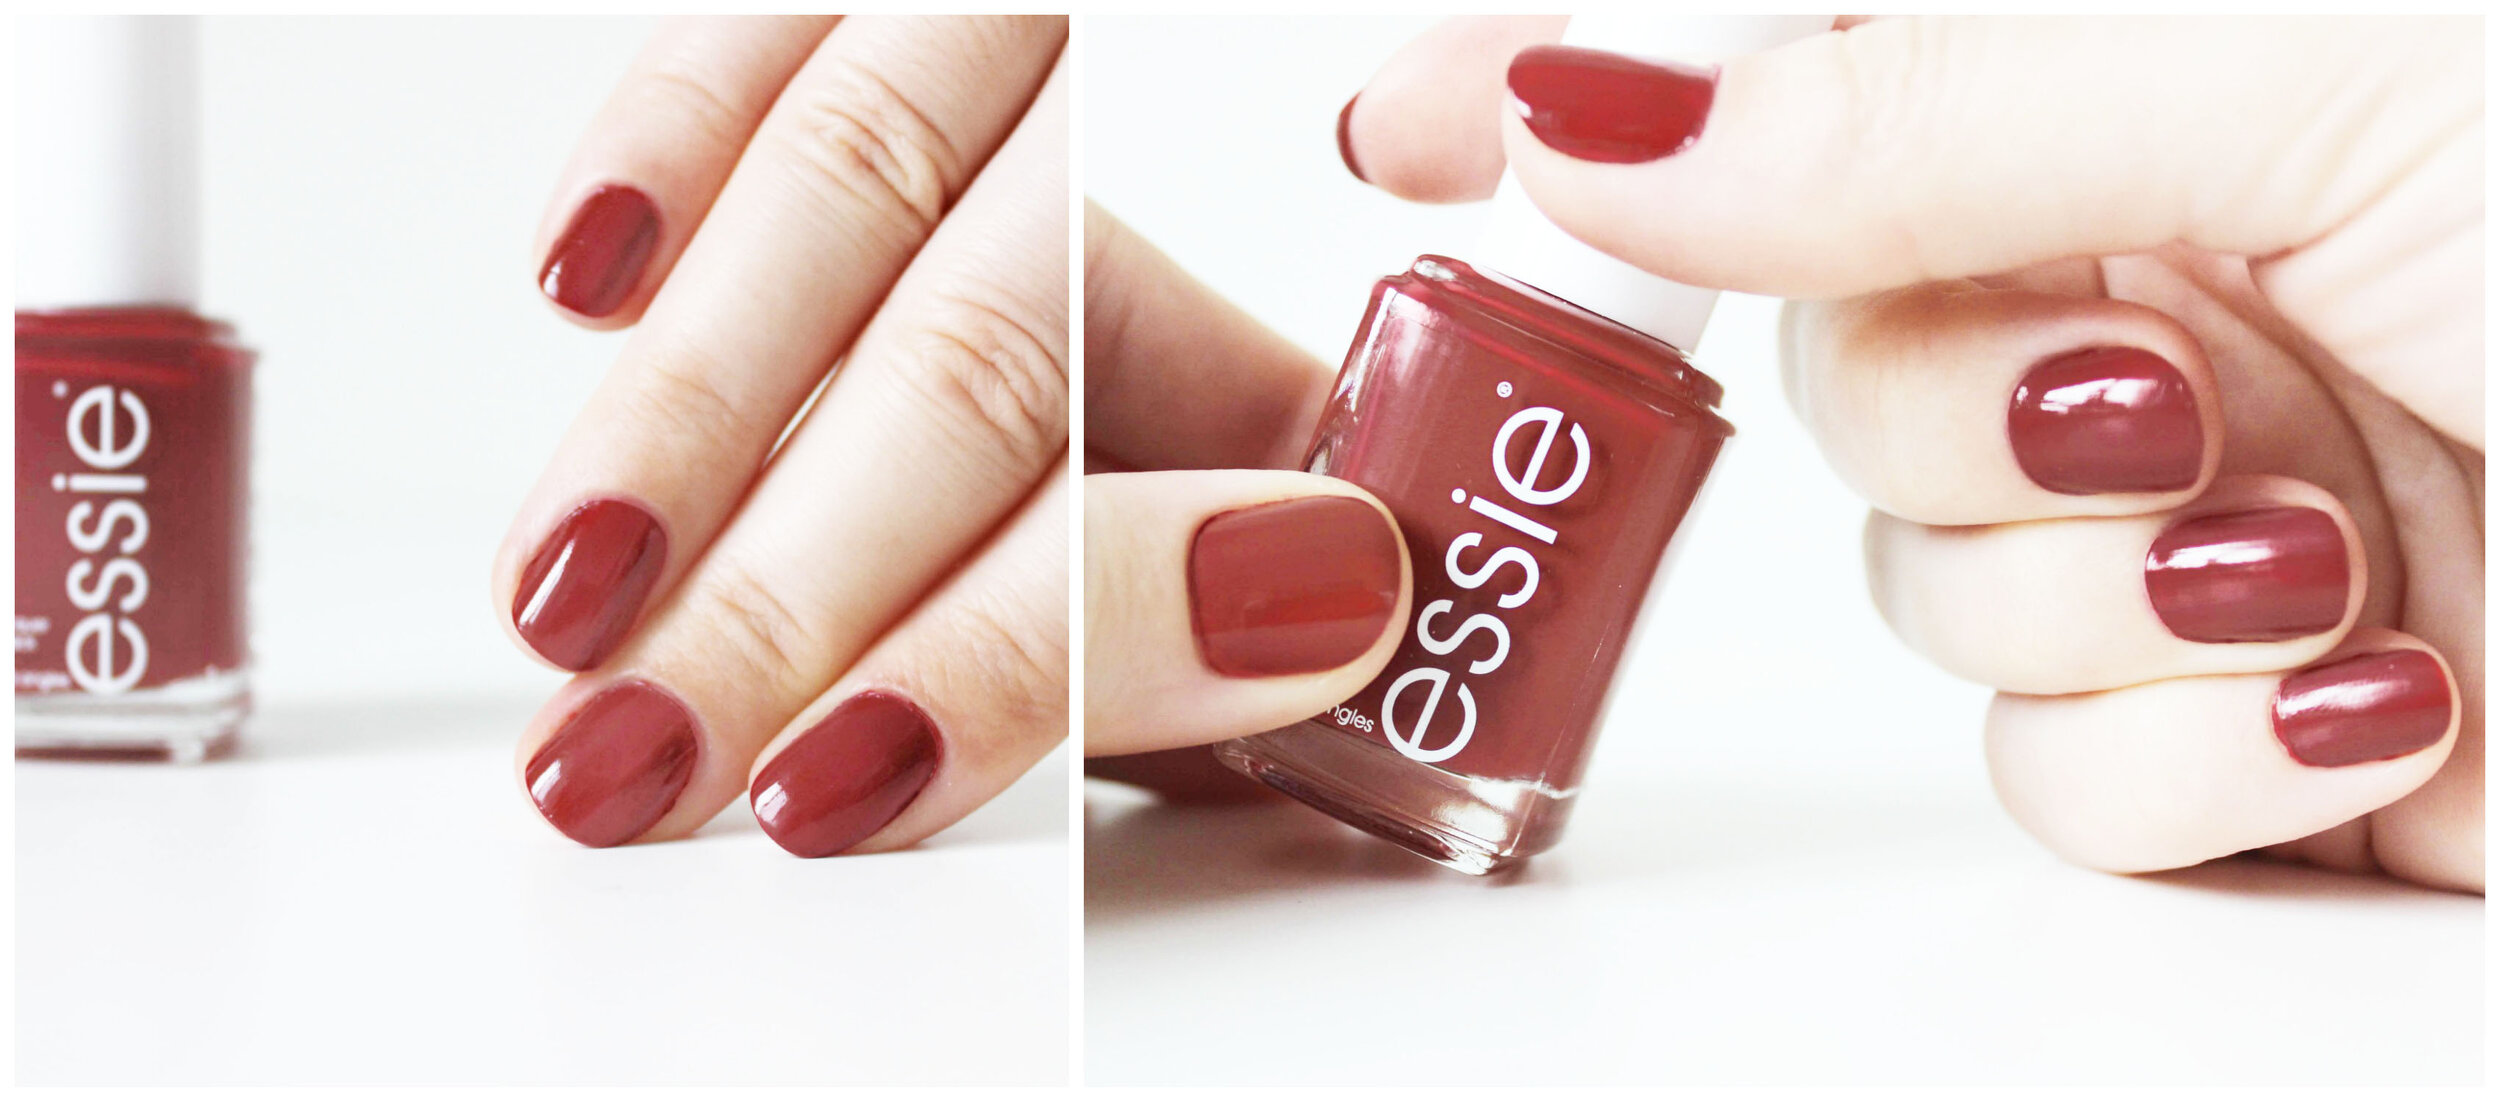
Next is another classic pairing, red and white. Here I’m featuring Essie’s Fifth Avenue (red), Between The Seats (a slightly off-white taupe) and Blanc (pure white).

As I find pure white on my nails quite stark (it can easily look like you just painted Tippex on your nails), I tend to prefer slightly more off-white colours for this particular combination. Essie’s Between The Seats is my perfect find as it has a slight grey taupiness to it that tones down the harshness of the white.

This combination reminds me a lot of summer with strawberries and cream and hence July and Wimbledon.

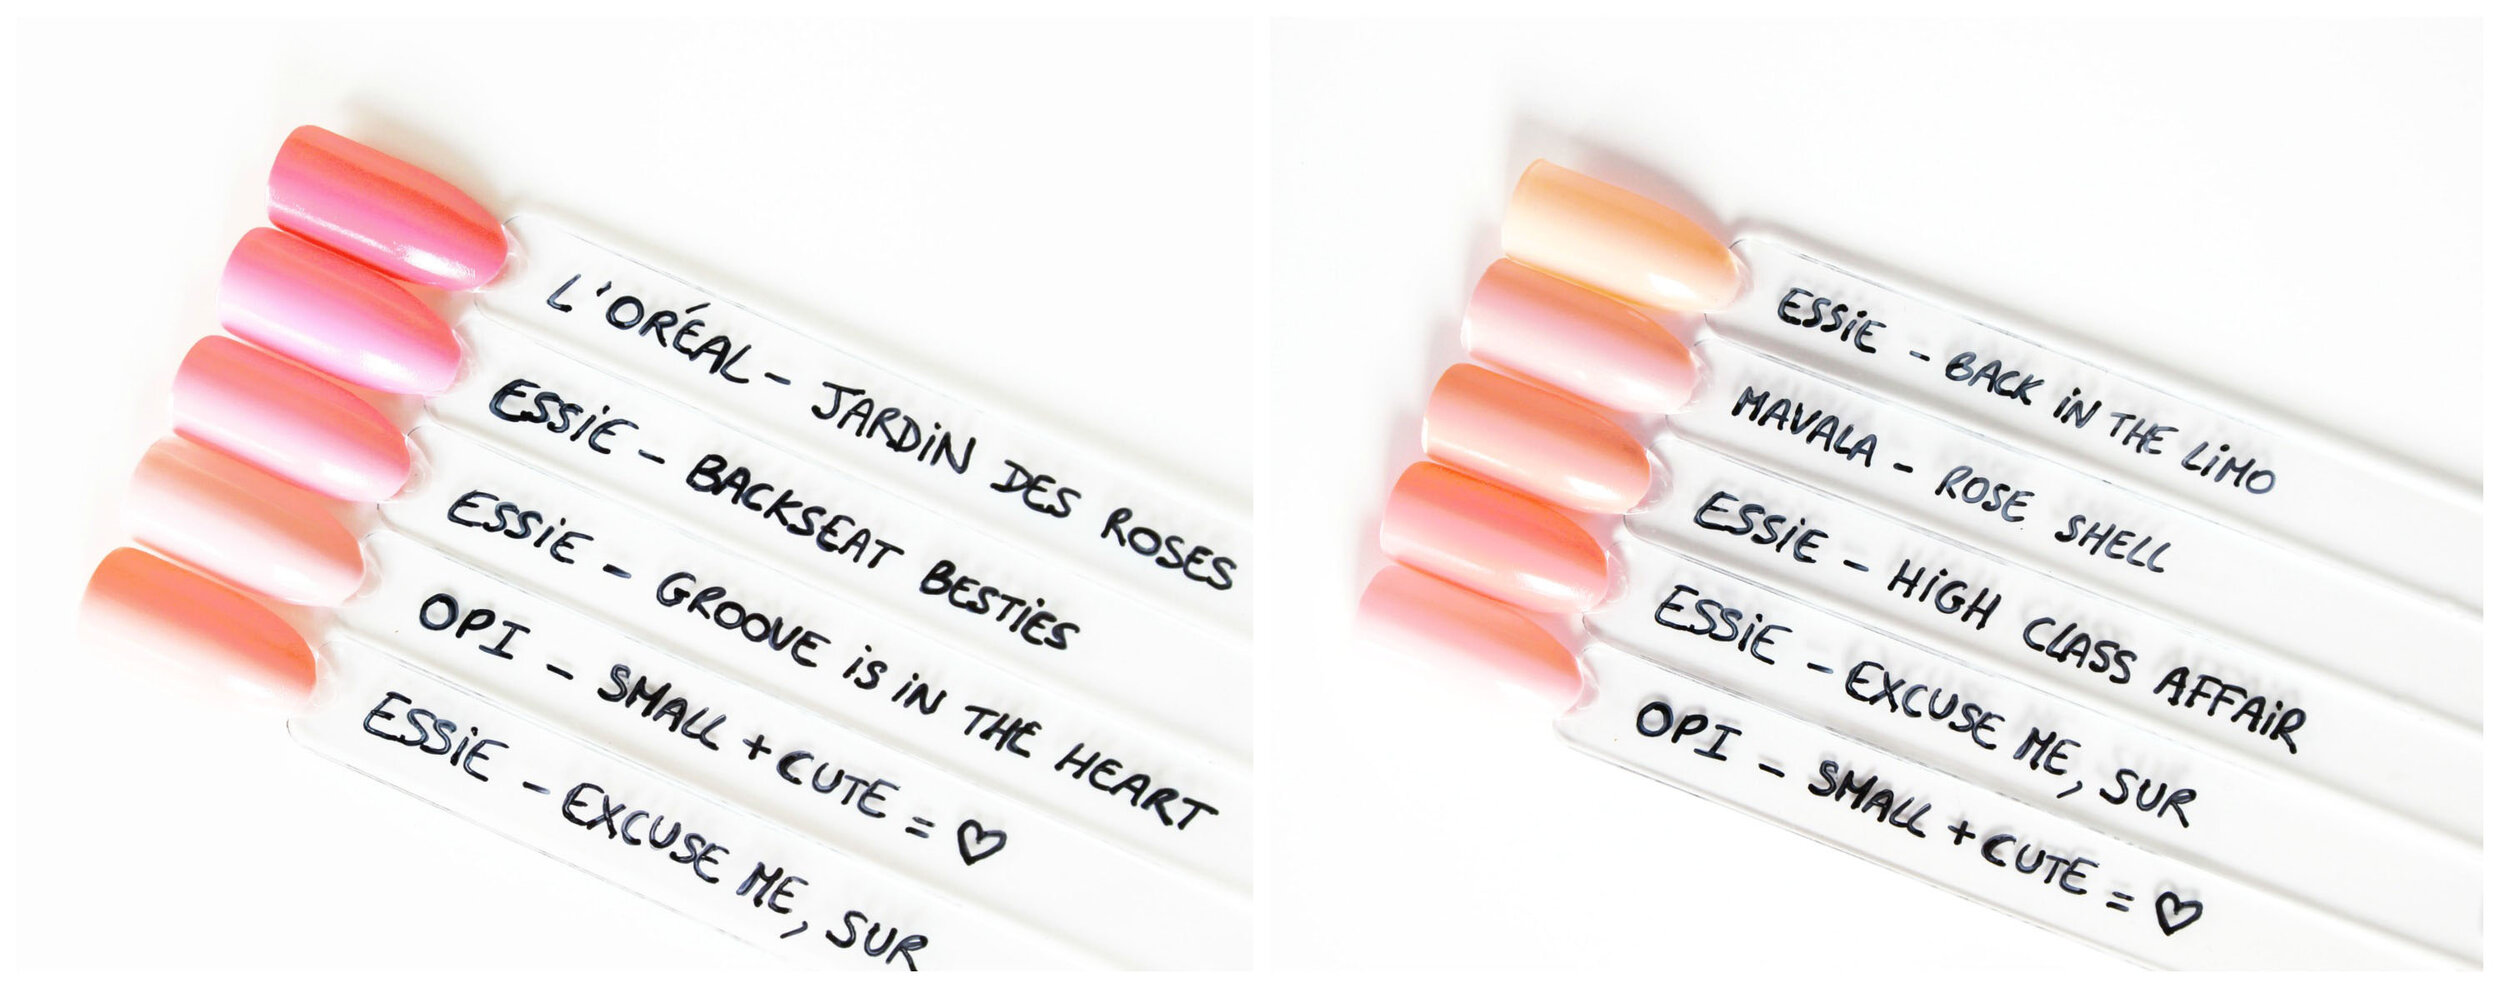
Next is a combination I tend to bust out quite early on in the year (certainly before sandal season), and that is red and pink, perfect for February and Valentine’s Day!
Here I have Fifth Avenue (red), Free To Roam (baby pink) and Muchi, Muchi (milky pink).

My personal bottle of Muchi, Muchi has gotten quite bleached over time (even though none of my polishes get any direct sunlight as they are all stored in a dark drawer). And as I recently bought a fresh bottle (hence how I know it’s a favourite) that is a lot pinker and closer to baby pink, I’m no longer sure what pink it’s supposed to be to begin with. I know US and European Essies are sometimes different colours altogether, a prime example being their Mint Candy Apple which is bluer in Europe and greener in the US.

But that’s beside the point, milky pink is probably the colour I wear most often on my toes in the summer (that or the off-white mentioned above), as it’s a neutral so goes with most of my outfits.
I do have to keep in mind that my pedicures last me 4 weeks and my manicure 4 days, so I am rather more daring with my manicure colours than the pedicure ones since I know the latter will limit my outfit choices for longer if I’m not going for a neutral or classic colour.

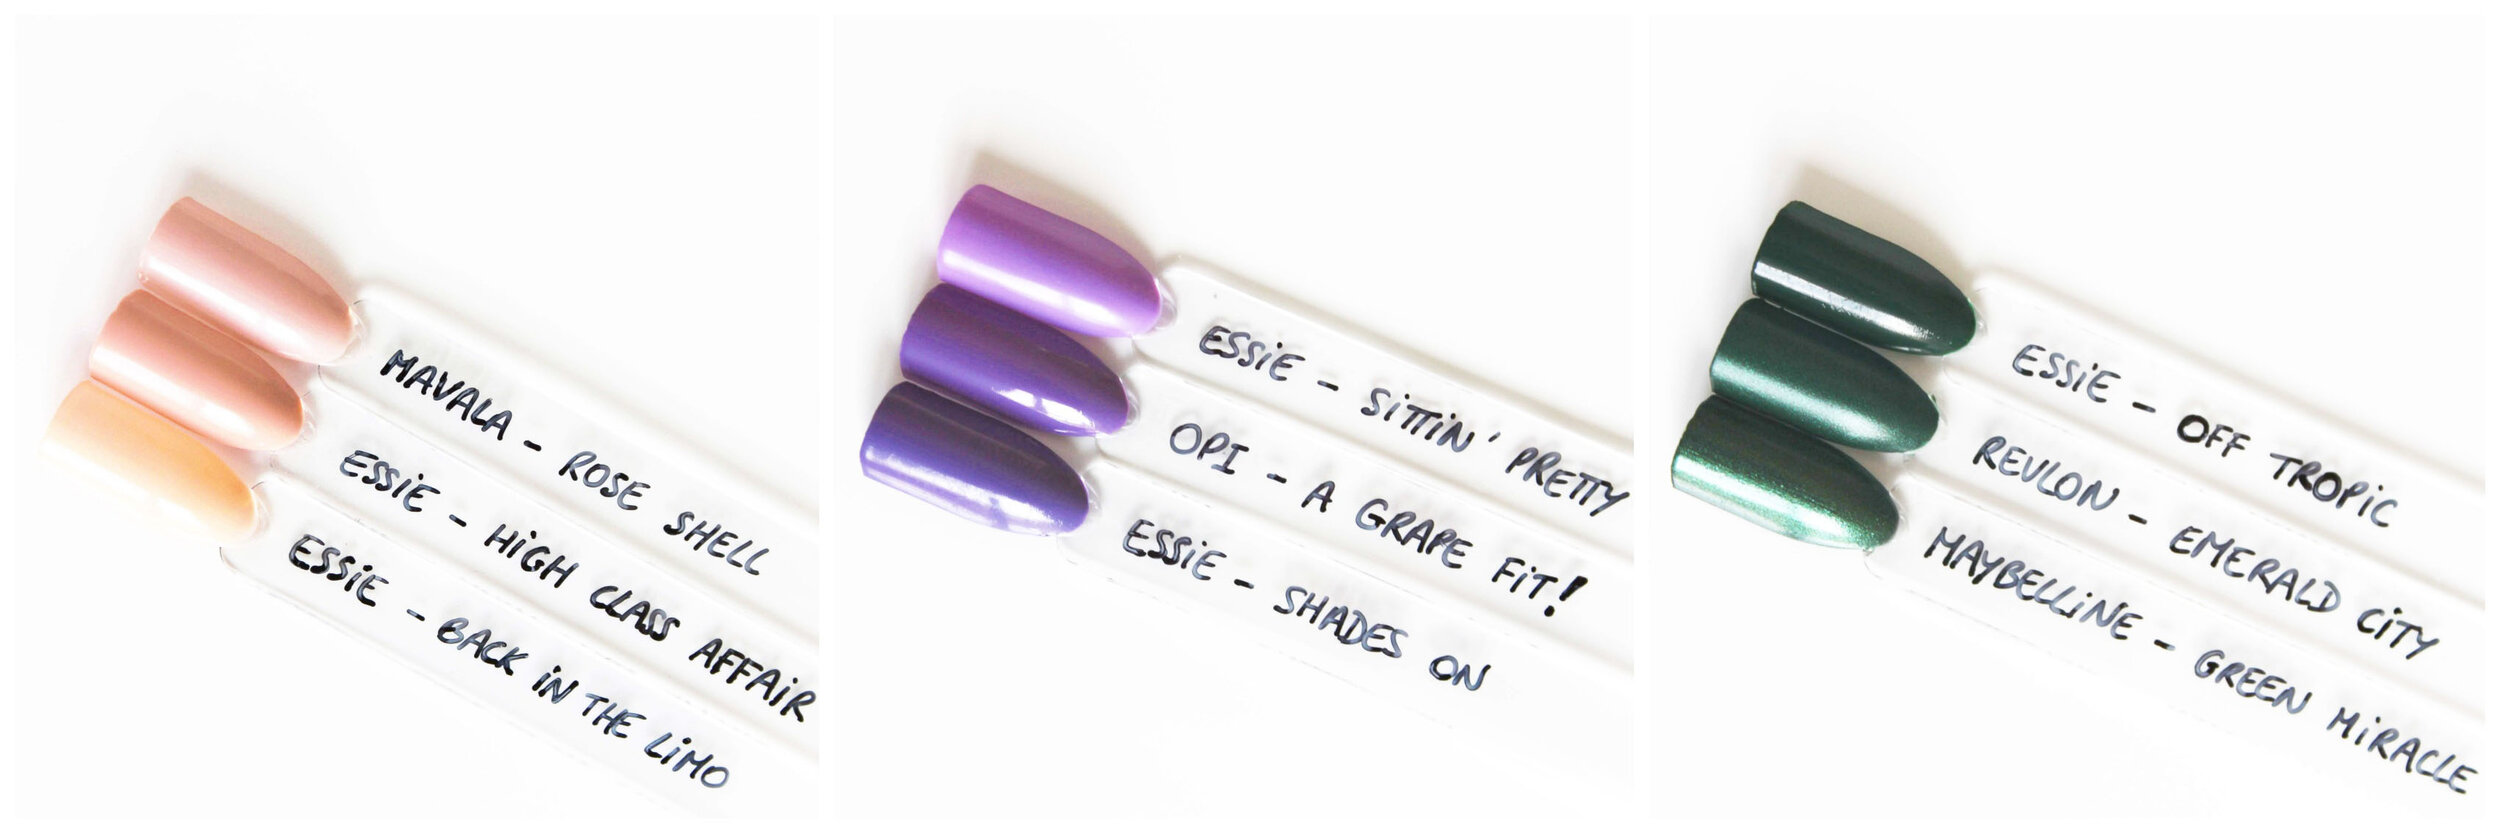
My next favourite combination is pink and green, which always screams refreshing watermelon to me. And it’s apt in this case since the pink here is Essie’s Watermelon and the green is Vibrant Vibes.

This particular shade of pink from Essie is quite a chameleon on the nails, more often than not it looks like a red but every once in a while, it’s distinctly pink…must be witchcraft!!! But as watermelons do the same thing, it really is perfectly named!!!

Now this is more “out there” (definitely limiting on your outfit options for sure!) but I just love the combination of orange (Souq Up The Sun) and turquoise (Bustling Bazaar) or even their pastel counterparts peach and mint.

I especially like this colour combination as eyeshadows in the summer; orange or gold eyeshadow on the upper lid and turquoise/mint eyeliner on the lower lashline.

This one reminds me of a gorgeous sunset over a tropical blue sea, and what’s beautiful in nature can’t be a bad combination anywhere else, can it?

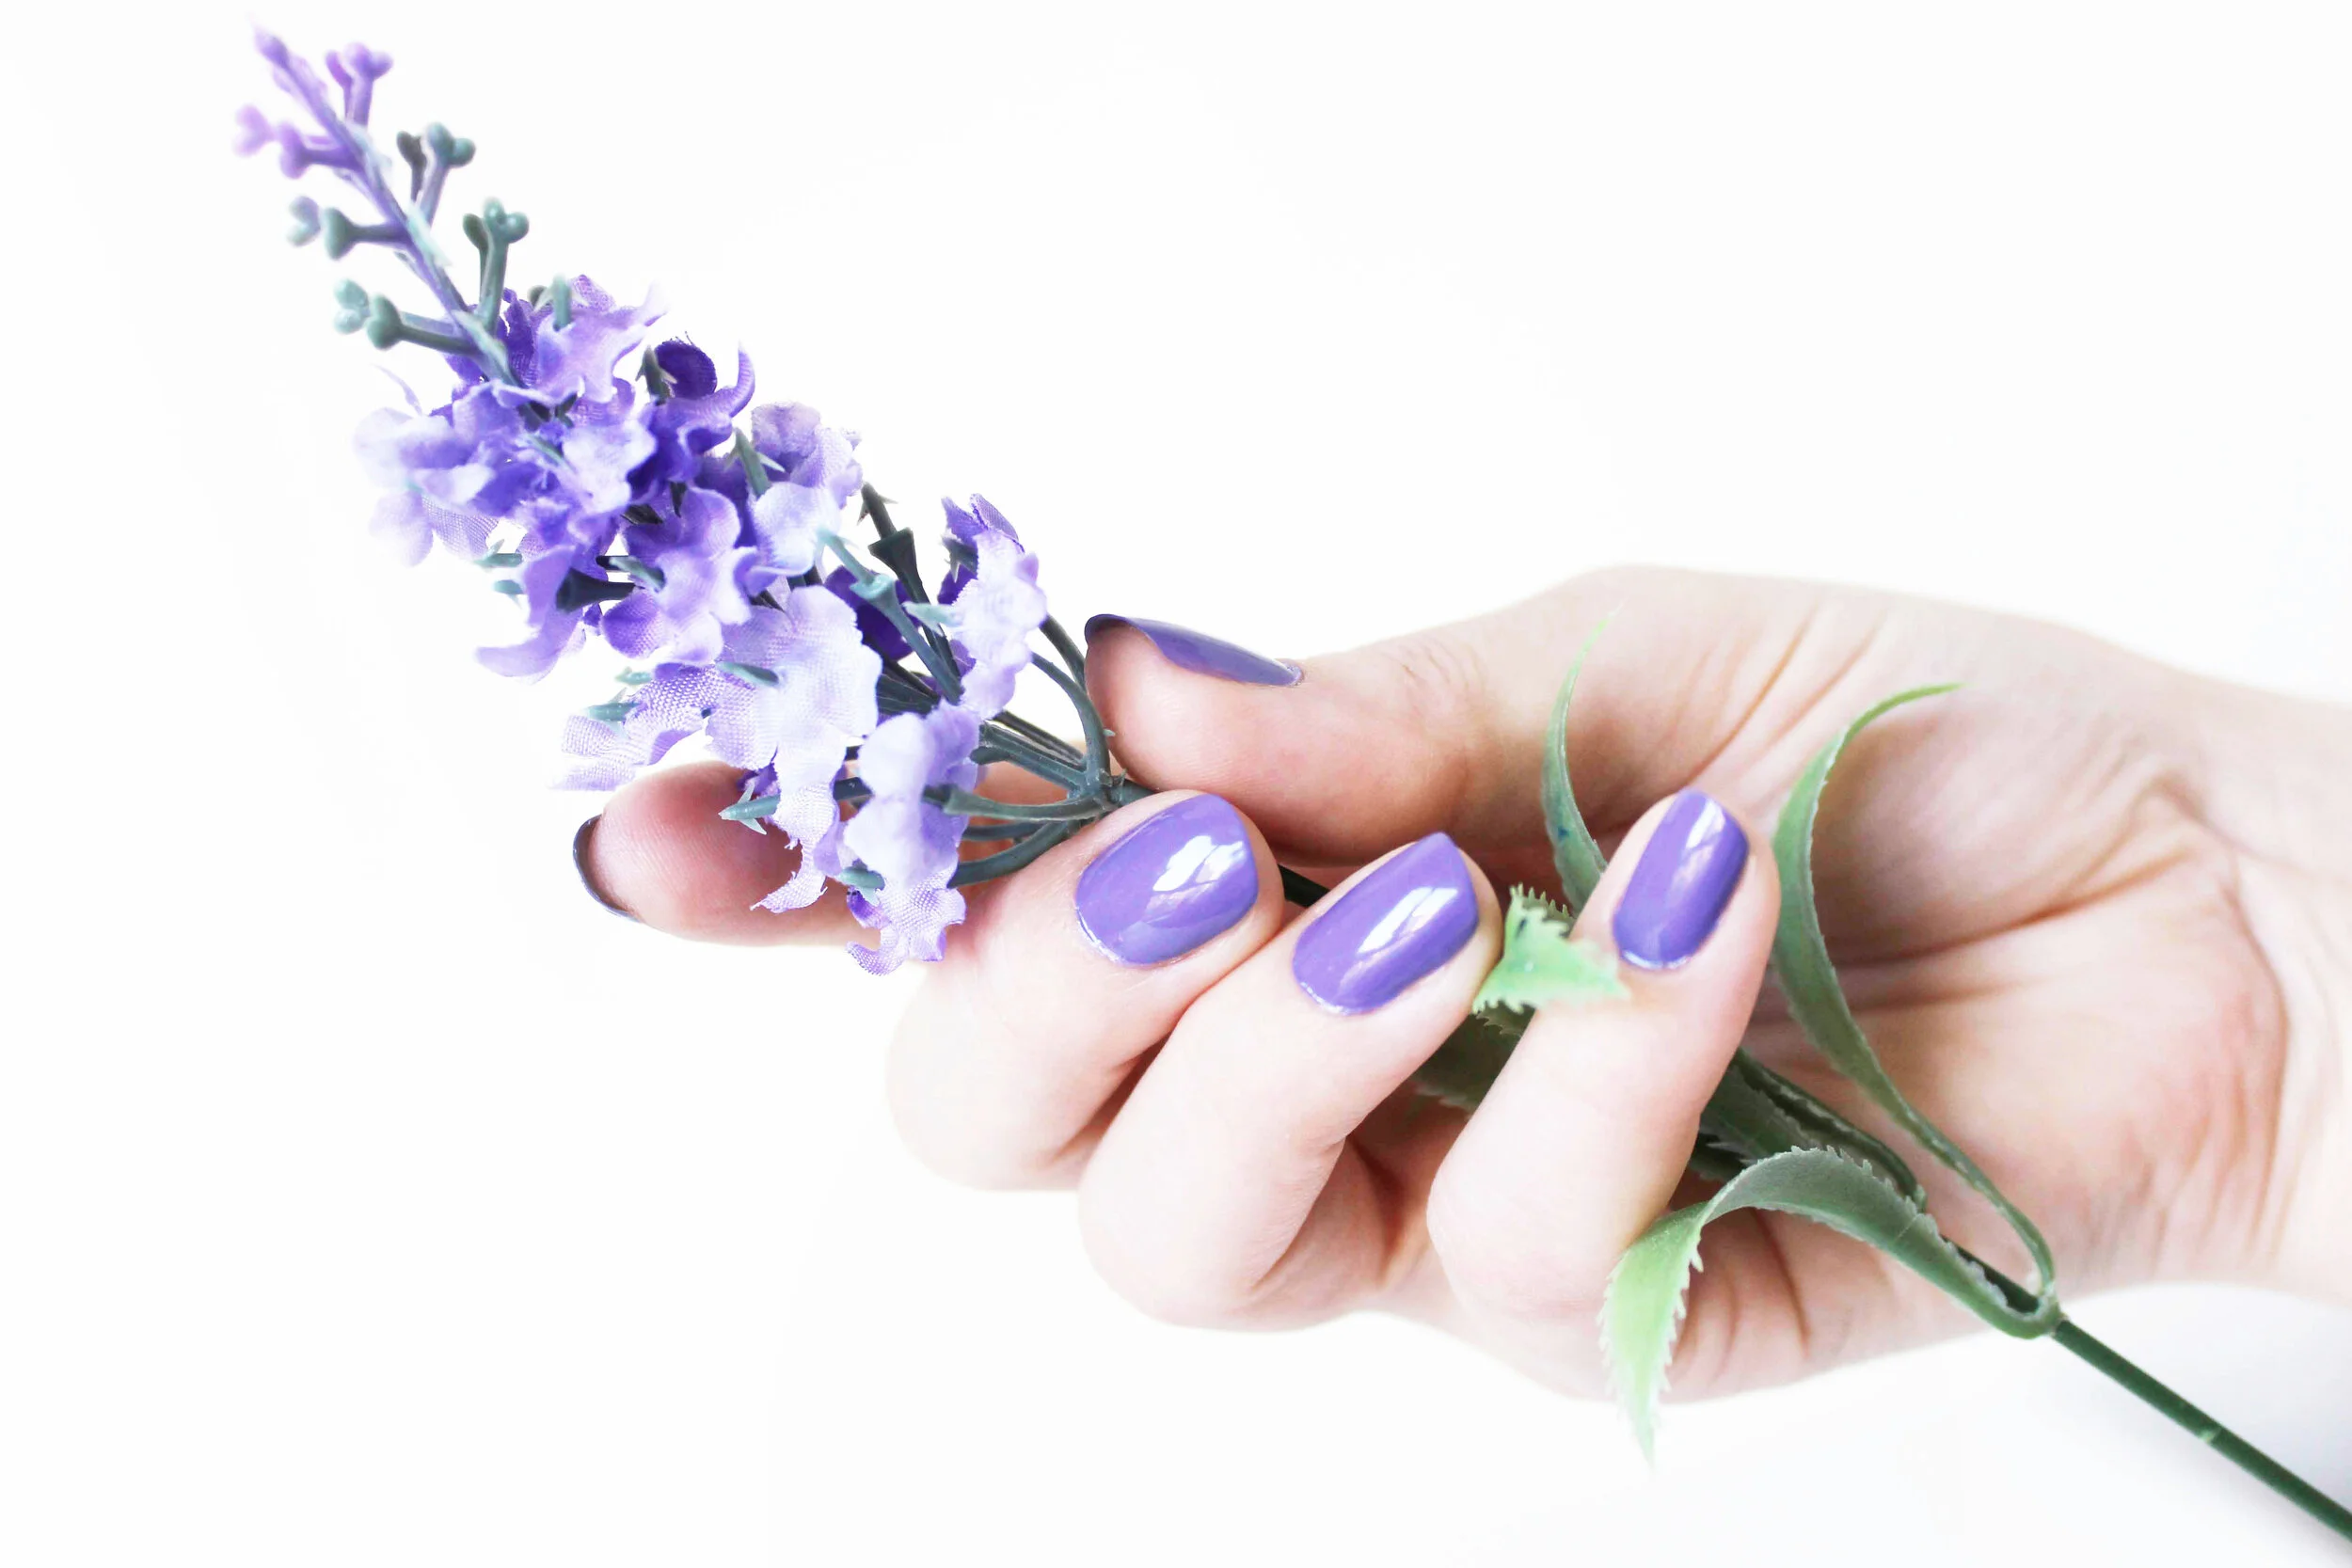
And finally one of my most recent discoveries, yellow and purple!
This combination was inspired by how well I thought the yellow and purple flowers looked together in my Galimard Perfume blog post.

Now finding a good yellow nail polish that is opaque in a couple of coats is quite a hard feat, but Essie’s Summer Soul Stice is a breeze to apply and if you don’t want to go full on purple with the combination then you could always try using a pinky purple instead, like Suits You Swell. But I do love my yellow with the full-on purple that is Worth The Tassel.

There you have it, my favourite mani/pedi combinations to wear in the hotter summer months.

Do you have any favourite colour combinations you think I need to try? Or are you more of a mani/pedi matcher (I do like to match every so often too)?

Did you also put Tippex on your nails as a kid when bored in class and hence now can’t get rid of that association as an adult?

Any fun summer/holiday plans now that travelling is back to normal again?

xxxemma

H&M Nail Polish Bauble

‘Tis the season!!! When I saw this amazing nail polish bauble set on the H&M website, I just knew I had to get it!!! After the beauty advent calendar boom over the last few years it was just a matter of time before ornaments got the same treatment from big beauty brands. While I’d personally love to have a tree full of Charlotte Tilbury lipsticks, that would be a taaaad bit out of my budget, so H&M it is!!! :P

H&M Nail Polish Bauble

I mean let’s call it what it is, they are essentially just sticking a ribbon on some pretty packaging and calling it a day. But I thought that this particular nail polish set was well done as an actual bauble. They also had a pink version, but I went with the more classic seasonal colours of red and gold. Plus, it actually went with my tree colour theme this year so how could I refuse?! Yes, I’m one of “those” Xmas people…what can I say, I must have been an Xmas elf in my past life!

H&M Nail Polish Bauble

Don’t let the photos deceive you the actual nail polish bottles are quite small (only 2ml worth) so that they can fit into a bauble, so you might only get a couple of manicures out of them at best! On the other hand, they would make it an ideal gift for any littler nail polish addicts out there who with their smaller fingernails might squeeze out a couple more uses out of these tiny bottles. I know I would have loved this as a kid!

H&M Nail Polish Bauble

Now onto the polishes themselves;

The red is a classic blue-toned red with a more jelly-like consistency than creme, so you do need a few coats to build up the opacity properly and with only 2ml to work with, that isn’t ideal.

The red glitter was my favourite from the set. Simply because Essie hasn’t come out with a red glitter nail polish yet in their Luxeffects line (still holding out hope though). For this one I had to do quite a bit of fishing to get enough glitters onto my brush and then more of a dabbing motion onto the actual nail to get an even placement of glitter. It has both tiny specks of red hexagonal glitters as well as larger ones in a clear base.

The gold is more of a metallic polish to begin with so it’s a tiny bit brushstrokey on application and dries a bit dull, so for full effect on this one I would suggest a high shine top coat.

And finally, the gold glitter unlike the red one also has added bar glitters to the two hexagonal shapes in its clear base which made it a lot easier to apply as the brush came out nicely covered and normal brushstrokes applied the glitter more or less evenly on the nail.

There you have it, a wonderful (and much cheaper) Xmas beauty ornament that I’m currently enjoying!

Now in an ideal world if you could have any beauty tree out there what would be your top ornament contender?
I know I would love an Essie tree! Although if I’m being honest with myself and my gigantic Essie collection I could either A) create one myself using clear refillable plastic baubles or B) not actually buy it because I would be getting too many doubles (which is what is currently stopping me from buying any of their advent calendars…but that’s a “me” problem :P)

What’s the most expensive beauty tree you’ve come across? I know the Louboutin lipstick ornament tree would just make my eyes water trying to do the math on how much that would be seeing as one lipstick is €95 a pop.

How about tree colour themes, any fellow elves out there going for anything fun?

xxxemma

Follow

Essie Retro Revival 2016 & 2017 Collection

As promised in my previous post, I'll be showing you how the Essie Spring Collection pinks compare to the Retro Revival 2017 ones. Forewarning though, I think only Europe received the latter (I could be wrong), and since I was unable to look up my usual nail polish sources (shout out to EssieEnvy of course!) for comparisons swatches beforehand, I was super curious to see how they would compare! However, since last year's Retro Revival Collection came out so sporadically for it to still be relevant at the time, I've decided to include the two I picked up then in this post instead; i.e. making my own little mini "all stars collection"! :P

RETRO REVIVAL 2016: THE BLUE & RED

Essie Retro Revival 2016

Essie - Starry Starry Night (Retro Revival 2016)

Essie in Starry Starry Night (Retro Revival 2016)

This is a gorgeous navy blue jelly polish (i.e. see through-ish) with silver hexagonal flecks of glitter. Now while this updated version for the Retro Revival Collection 2016 doesn't contain the original diamond dust from the mid-90s formula, which made it so unique and eye-catching, I still think it's rather beautiful. Plus, you know me, the Art Historian inside couldn't resist the name! :P

APPLICATION

- 2 coats on top of Orly's glue basecoat for easy swatch removal.

While you could get away with 1 coat with no streaking or patches, as it's a jelly formula you really only get the full opacity and dazzling effect from this polish at 2 coats. Plus, the second coat means that some of the silver glitters from the original coat get covered a bit with some of the blue jelly and hence turn blue. Therefore, at two coats, you get a lovely combination of a dark navy base with blue and silver glitters.

Unfortunately, I don't own the original polish for comparison swatches (I was only six when it was born in 1997 #dilemma), but I have found two blog posts here and here that have made excellent (and detailed!) write ups respectively. As for me, I could only compare this polish (see below) to pretty much all the navy blues that I own (as I said before, not a colour I'm usually drawn to). And while I still have to give it to OPI's Cosmo with a Twist (from their Starlight Collection) as my favourite representation of a night sky in a polish (what can I say it's a dark aubergine base with a duo-chrome micro-shimmer in blue and pink), Starry Starry Night is officially a close second!

Essie in Starry Starry Night (Retro Revival 2016)

Essie - Life Of The Party (Retro Revival 2016)

Essie in Life Of The Party (Retro Revival 2016)

This is a gorgeous deep red pearlescent nail polish. And where OPI beat Essie in the night sky department, Essie gets one up with Life Of The Party compared to Let Your Love Shine (see comparison swatch below). Not because of the colour, since Let Your Love Shine contains a micro-shimmer that makes it more "glittery" than pearlescent, but in terms of formula! Let Your Love Shine has repeatedly chipped very quickly on me; check out my blog post on OPI's Starlight Collection for more info.

APPLICATION

- 2 coats on top of Orly's glue basecoat for easy swatch removal.

Again, like Starry Starry Night, you could get away with 1 coat if you really wanted, since there is no streakiness or patchiness upon first application. But I would recommend 2 coats just because the colour deepens to that of the bottle and is way prettier in that hue in my opinion.

Essie in Life Of The Party (Retro Revival 2016)
Essie Retro Revival 2016 Comparisons

RETRO REVIVAL 2017: THE PINKS

Essie Retro Revival 2017

Essie - Chastity (Retro Revival 2017)

Essie in Chastity (Retro Revival 2017)

A gorgeous bubble-gum pink creme polish, near identical to OPI's Look at My Bow! from the Hello Kitty Collection albeit a bit darker (see comparison swatch below), but once again with a way-better formula.

I wore Chastity on my trip to Madrid, it lasted 5 days including a hair wash day (I'm rough with my nails on that day) and when I took it off on day 6, it was still a near perfect manicure (one minor chip)! Way better than Look at My Bow! which chipped on day 1 and which requires an extra coat to begin with (3 coats). Once again Essie has a superior formula.

APPLICATION

- 2 coats on top of Orly's glue basecoat for easy swatch removal.

This polish is a tiny bit streaky on its first coat, but opaqueness is brilliant! Obviously, I'm photographing my nails which makes any streaking way more noticeable, so I did two coats to be safe.

Essie in Chastity (Retro Revival 2017)

Essie - Flawless (Retro Revival 2017)

Essie in Flawless (Retro Revival 2017)

This has got to be my favourite pink creme polish of the lot (yes including the two from the Spring Collection). It's a baby pink with a slight duskiness/peachiness to it, stunning! Looking at the comparison swatches below you would be forgiven for thinking that it looks very similar to Groove Is In The Heart and hence Backseat Besties (the version I got anyway), but you can just about see it's a bit more dusky.

APPLICATION

- 2 coats on top of Orly's glue basecoat for easy swatch removal.

Flawless is a bit more watery than Chastity and hence really wants to pool in the cuticles on the 1st coat. It's also streaky on the 1st coat so it definitely needs that 2nd coat to achieve full opacity and smooth finish.

Essie in Flawless (Retro Revival 2017)
Essie Retro Revival 2017 Comparisons

There you have it my top picks from this year and last year's Retro Revival Collection.

Which was your favourite?

Are you a big fan of pinks like me and hence loving Essie's collections at the moment?

Are you one of the few lucky ones to still own an original Starry Starry Night? And how to you think it compares with the new one?


xxxemma

Follow

Essie Spring Collection 2017

Sooooo it might have been a while since I've written a blog post...therefore excuse me if I'm a little rusty! :P But as the Essie Summer Collection has already made an appearance in my local Di (guys it's gorgeous!!!), as well as the NEON ONE (ahhhhh this is not a drill guys; we've finally received an in-between collection!!!!), I thought I'd better hurry!

Essie Spring Collection 2017

This Spring Collection is based on "don't stop till you hit the border" road trips, which is great in theory (especially if you live in the US), but in Belgium that's about an hour and a half trip (hey "we may be a small country, but we're a great one, too" bonus points for those who can name that quote)!!! So not much of a "vacay with your besties" which is what this Collection had in mind. Anyway, I only picked up two from this year's Collection, and although I was very tempted by the green polish in On The Roadie, my heart is still set on getting First Timer or Mojito Madness (one day guys, one day!). But if you're interested to see how they compare, then, as usual, I highly recommend you check out Kindra from EssieEnvy! She has all the colours from this Collection (and relevant swatches) here and an Essie green swatch comparison post here.

You'll know, if you've read any of my previous nail posts, that I'm not a big fan of dark or navy blues on my nails unless they have something interesting going on like Aruba Blue or Loot The Booty. So it's no surprise that I had to give All The Wave a miss, it's just not for me. And finally, B'aha Moment and Designated DJ didn't make the cut either because I have wayyyy too many polishes in my collection that look similar, hence I really didn't feel the need for them.

P.S. I have yet to test wear time on these two, but they're my favourite plasticised creme finish; so I can't imagine they would be much different than the standard 4-5 day wear I usually get.

Essie in Backseat Besties (Spring 2017)

Essie - Backseat Besties (Spring 2017)

Described as a "pink plumeria" (had to look it up...it's a flower guys!) it is a gorgeous light pinky coral colour. I was very interested to see how the two pinks from this Spring Collection would compare to the Retro Revival 2017 ones (next post guys) but #SPOILERS Chastity is totally different (way more blue-toned) and Flawless is close but again pulls a bit more blue and dusky and hence less coral (comparison swatch in next post). However, #DUPEALERT Backseat Besties has a twin (which is a hair lighter) and it's Groove Is In The Heart (see comparison below), so if you have that shade already, you really don't need this one...D'OH!

APPLICATION

- 3 coats on top of Orly's glue basecoat for easy swatch removal.

EDIT: After doing some research (i.e. looking at my favourite nail blogs EssieEnvy and Imabeautygeek including the Essie UK website) I think it's safe to say that my bottle of Backseat Besties might be a mistake batch. Because as I said above, mine is near identical to Groove Is In The Heart yet for everyone else, it seems to be much more of a Barbie blue-toned pink. Anyone else in Europe encountering this?!

EDIT TO MY EDIT: Scratch that, Lauren from Laurens-list (a Canadian beauty blogger) seems to have the same version as me, so maybe the US version is a different one? Wouldn't be the first time (cough...cough Mint Candy Apple).

Essie in Excuse Me, Sur (Spring 2017)

Essie - Excuse Me, Sur (Spring 2017)

Described as a "sun kissed coral mango" (quite the imagery, right?!) this is a bright peachy colour (mango is a lot darker) but I'm not going to debate the choice of fruit! :P Loved this one! Really elegant against my skin tone and the perfect "nude" for me. Unless I'm purposefully going for the mannequin hand look (a rare occasion), I like my nudes to have a slight wash of colour/punch to them. Especially in springtime, when I'm in the mood for something brighter after the wintery months of March and April and Excuse Me, Sur is that perfect colour!

APPLICATION

- 3 coats on top of Orly's glue basecoat for easy swatch removal.

Essie Spring Collection 2017 Comparisons

There you have it, my two picks from the Essie Spring Collection.

What's your favourite colour to wear after the miserable March and April months (weather wise) and gets you in the mood for spring?

Have you ever encountered a similar issue with a batch of nail polish being the wrong colour?

Lastly and most importantly (I know I said I wouldn't debate this), but do you consider Excuse Me, Sur to be more of a mango or a peach? :P


xxxemma

Follow

OPI Breakfast at Tiffany's, Holiday 2016

When I first saw the OPI Breakfast at Tiffany's Collection, back in September (what can I say...I'm impatient), I was super excited!!! A polish collection inspired by Audrey Hepburn, YES PLEASE!!! Okay...so...technically it was inspired by Holly Golightly (the character she plays in Breakfast at Tiffany's), but it's arguably her most iconic role and who doesn't instantly recognise THAT poster?!

OPI Breakfast at Tiffany's Holiday 2016

So here's my take on this Collection, yeeesss I had to hand-paint these boxes myself because let's be honest, I can't afford even the cheapest item at Tiffany's (I looked!). Plus, I was way too intimidated to just go into a store (yap, we have one here in Brussels) and ask for a couple of boxes. So hopefully, I got the famous "Tiffany blue" colour right (I did have to correct it a bit in Photoshop), admittedly I have extended my talent repertoire since I can now tie the perfect bow (pure amateur before) so it's not all bad!

Although I was very tempted by Five-and-Ten and Rich & Brazilian, I only picked up two polishes from this Collection: Breakfast at Tiffany's and I Believe in Manicures. If you are curious to see full swatches of the other polishes then I highly recommend; Imabeautygeek as always and a new discovery for me; nailsbyic. Also, I haven't tested these two polishes out as full manicures (I know, what's wrong with me?!) so I can't attest to their wear and removal just yet.

OPI in Breakfast at Tiffany's (Breakfast at Tiffany's Holiday 2016)

OPI - Breakfast at Tiffany's (Breakfast at Tiffany's Collection - Holiday 2016)

The namesake of this Collection, I just knew I had to pick it up! This is a gorgeous light pinky cream almost white in colour. However, as you can see in relation to a pure white nail polish like OPI's Alpine Snow (in the comparison swatch below) it's ever so slightly tinged pink. This is a matte polish which also contains some very light gold and white micro-shimmer.

APPLICATION

- 3 coats on top of Orly's glue basecoat for easy swatch removal.

As always with OPI polishes, I had streaking issues and hence needed 3 coats to both reach full opacity (it's the slightest bit sheer in comparison with other plain creme polishes) and to get no visible streaking.

With the more layers you add, I've noticed the less matte the polish becomes (or maybe it needs to have 100% dried to be the same level of matteness as the first coat). Either way, the gold/white micro-shimmer gives this polish an iridescent quality which distinguishes its finish from the normal "dullness" of a matte. But if mattes are not your thing, you can always add a normal top coat and you have a whole new pretty polish to play with! Plus, the shimmer really stands out when not mattified.

Now, I don't smoke (coz ewww) but I just HAD to recreate my version of the famous Breakfast at Tiffany's poster! Of course, blonder (in the sunlight guys!) and minus the beehive and tiara because #shorthairdontcare. Also, this may be the first time someone has had to Photoshop IN a cigarette.

But my skills don't compare to this ad which CGI'd the youthful Audrey's face onto a body double...AMAZING!!! As well as a little spooky!

OPI in I Believe in Manicures (Breakfast at Tiffany's Holiday 2016)

OPI - I Believe in Manicures (Breakfast at Tiffany's Collection - Holiday 2016)

The only bright blue of this Collection and gasp...it isn't quite a Tiffany blue! Had it been a tad more green/turquoise it would have been the perfect match! Nor is it a sky blue like OPI's The I's Have It from their Alice Through The Looking Glass Collection (comparison swatch below). Nonetheless, it's still a gorgeous polish (who knows; maybe you need some sort of license to recreate the exact shade of Tiffany blue?). Bright, fun and a rather unusual colour to be sporting during the winter months (I like to wear Holiday Collections at least till the end of January) I think it makes for a nice change.

APPLICATION

- 3 coats on top of Orly's glue basecoat for easy swatch removal.

Again, as with all OPI cremes; streakiness on the first 2 coats (even though opacity is great). I needed 3 coats to get rid of all streaks (the 3rd coat being quite thick), hence why I much prefer Essie formulas; I just never have this issue!

OPI Breakfast at Tiffany's Holiday 2016

But I can't be the only one constantly experiencing streaking with OPI creme polishes? Let me know in the comments below if you also have this issue with the formula and how you deal with it? Honestly at the price they charge I expect much better by now (especially with KIKO polishes at 1/6 of the price and still of excellent quality).

OPI Breakfast at Tiffany's Holiday 2016

So there you have it, my rather small take on the amazing OPI Breakfast at Tiffany's Collection.

Which colour was your favourite/did you pick up?

What's your favourite Audrey Hepburn movie? I love My Fair Lady (those hats, those dresses!), but with Audrey's effortless language skills (Dutch, English, Italian, Spanish and French) it's not surprising she manages to do accents so easily. Okay, she was born in Brussels and was half-Scottish; so what's not to like?! (hint, hint...nudge, nudge)

Who should OPI do their next Holiday Collection on? I think a Marilyn Monroe Collection would be amazing! I can just picture it...a gorgeous true red along with some really sparkly ones (like from their Starlight Collection) and calling at least one of them "A Girl's Best Friend" :)

Oooh or a Judy Garland one with "Merry Little Christmas" or "There's No Place Like Home" as possible naming options...Okay I'm getting way ahead of myself and I'd better stop here before I invent a whole fall/winter collection for my non-existent nail polish line (...one day guys, one day).


xxxemma

Follow

Essie Winter Collection 2016

Essie Winter Collection 2016

When I first saw this year's Essie Winter Collection, I've got to be honest I was a bit disappointed! Needless to say, I didn't pick up the standard red that is Party On A Platform, nor the salmon pink pearl finish in Oh Behave! (ugh...I know what you're thinking ever since the Retro Revival Collection, these old fashioned polishes keep popping up!).

The turquoise that is Satin Sister I would have bought had I not owned an exact dupe already, I used to wear turquoise on my nails quite a lot five years ago but now it remains barely worn (but you never know when the mood might strike again). And finally I gave the grey Go With The Flowy a miss too, because a) I'm not a fan of grey on my nails (it's such a non-colour, why bother?!) and b) according to Kindra from EssieEnvy (you need to check her out if you haven't already) the formula is pretty bad.

So I know my swatches are quite limited with just Getting Groovy and Ready To Boa, but I'm not made of money and I can't afford to buy polishes I'm not going to wear (...and I can't afford to buy polishes I do wear, but that's another story!)

Essie in Getting Groovy (Winter 2016)

Essie - Getting Groovy (Winter 2016)

Described as a metallic gold palladium, this polish is essentially the gold version of Apres-Chic; the silver micro-shimmer from last year's Winter Collection. Getting Groovy is also a micro-shimmer and acts exactly like its counterpart; it applies like a dream, removes surprisingly easily and will be everyone's favourite! Last year, Apres-Chic was my surprise favourite and I bought a second bottle to have in stock, I loved it that much! I can see Getting Groovy going the same way...now Essie can we have three for three? Maybe a rose gold micro-shimmer for next year's winter collection, pretty please?! Anyway, this gold is pretty light and dainty in colour (thanks to the silver-ish hue of its micro-shimmer), not too yellow or brassy nor dull and dark/almost green looking in colour. It's honestly the most perfect light gold, and - better still - one you might not actually own already!

APPLICATION

- 2 coats on top of Orly's glue basecoat for easy swatch removal.

This polish could be a 1 coater on short nails, on long nails though 2 coats are needed to properly cover the free edge of the nail. The 2nd coat does darken the gold a tad, but not by much.

WEAR

I've already worn this one as a full manicure and unlike Apres-Chic (which already has pretty impressive lasting power) this polish is outstanding! With long nails I managed 4 days chip free having been very manual intensive those days (including washing hands thoroughly with a nail brush cleaner after varnishing boxes several days in a row).

REMOVAL

Easy removal for a metallic micro-shimmer, although it does leave a few flecks of micro-shimmer behind all over you fingers, simple targeted hand washing deals with that issue no problem.

Essie in Ready To Boa (Winter 2016)

Essie - Ready To Boa (Winter 2016)

This glistening bronze mahogany (can't give a more accurate description if I tried), is gorgeous but a bit dark, the warmth of the bronze doesn't really give the "lit-within" look when on the nails as much as it does in the bottle. It's a shame but not unexpected since both OPI's Every Month is Oktoberfest (more purple in tone) and German-icure (more red) from the Germany Collection (Autumn 2012) had the same lacklustre effect when actually on the nails as opposed to in the bottle. Ready To Boa is still a nice colour, though if you're into your dark nails (which is what winter's for) I just wish it had lived up to its potential!

APPLICATION

- 2 coats on top of Orly's glue basecoat for easy swatch removal.

This is a 1 coater, I did 2 because I was taking photos and I didn't want any free edge to be visible (they can sometimes sneak up on you via the detail of the camera) but half-way done with my first hand I was seriously questioning why I had bothered with the 2nd coat. 1 coat is perfect but if you were to add a second one, then know that the colour doesn't deepen.

WEAR/REMOVAL

I haven't worn this one as a full manicure yet, so I can't attest to how well it lasts or removes.

There you have it, my somewhat limited selection from the Essie Winter Collection 2016. What did you think of this year's collection?

Which colours did you pick up? How did you like them?

Would you like to see a rose gold micro-shimmer similar to Getting Groovy and Apres-Chic next year?

And last but not least, how adorable is my Rudolph wrapping paper? I got it from Stonemanor (a shop that sells English goodies here in Belgium and always has a huge selection of festive decorations, especially for Halloween and Christmas; they go all out!)


xxxemma

Follow

Seventeen Colour Carnival

So now that it's the Holiday season, we all know what it means...candy?! No, good guess though (nods in approval) but GLITTER!!! Yap, there's no excuse, you can go full on sparkle in the month of December and no one can judge you! Last year, I got my shimmer fix with the OPI Starlight Collection, but this year my Dad came across these by chance in Bluewater and instantly thought of MOI...quelle surprise!

Plus, at £1.99 or 3 for £3 in Boots, it's a far cry from the expensive OPI polishes, honestly what's not to like? So go on, I dare you, dazzle with me...

P.S. Sadly I can't attest to how these polishes wear and tear, or remove since I've only tried them as swatches, but you can still enjoy the prettiness! Also, the collection in fact includes a full range of finishes; I've just concentrated on the glitters.

Seventeen in Holo Glitter (Colour Carnival)

Seventeen - Holo Glitter (Colour Carnival)

I've never owned a holographic nail polish before let alone a glitter one (I know hard to believe with my MAHUSIVE collection), and I was super impressed with this one. In case you're confused as to what exactly is the difference between holographic and regular glitter, when the light hits a holographic nail polish/glitter it changes colour, so your polish can look like every colour of the rainbow all at once. However, with just regular glitter polish, each "flake" of sparkly material is one "base" colour and when the light hits it, it just flashes between that colour and white (or however you would describe a sparkle).

APPLICATION

- 3 coats on top of Orly's glue basecoat for easy swatch removal.

Super easy application, the glitter is evenly distributed and applies effortlessly without having to "fish" in the bottle, or dab on the nail to fix empty patches. And compared to the gritty finish of the OPI Starlight nail polishes, these dry quite smooth too.

Seventeen in Blue Glitter (Colour Carnival)

Seventeen - Blue Glitter (Colour Carnival)

I was super excited by the colour in the bottle of this one. A gorgeous electric blue that unfortunately doesn't translate to the nail. Even after three coats, I could only get it to become a light pastel blue colour. Had the base been more pigmented, then I think my free edge wouldn't have been visible either (the part that grows out of the nail; usually highlighted in a French manicure).

APPLICATION

- 3 coats on top of Orly's glue basecoat for easy swatch removal.

Easy application, does dry a tiny bit gritty but nothing too bad that would snag on your clothes or anything else.

Seventeen in Purple Glitter (Colour Carnival)

Seventeen - Purple Glitter (Colour Carnival)

This one was a bit of a trickster, in the bottle it looks like more of a muted, almost grey-ish, purple but on the nails it has quite a bit of warmth to it and is more of a fuchsia purple. The photos show perfectly what I mean too! (A rare occurrence, since usually the camera likes to change the real-life colours).

APPLICATION

- 3 coats on top of Orly's glue basecoat for easy swatch removal.

Once again, wonderful application, this one dries more like the Holo Glitter from above, i.e. pretty smooth and not too gritty.

Seventeen in Deep Red Sparkle (Colour Carnival)

Seventeen - Deep Red Sparkle (Colour Carnival)

I've been looking for an all-out red glitter for ages, you'd think it would be easier to find given the Holiday season, but I've had no luck for the last couple of years. This one would fit the bill if only it had a whole lot more glitter to it (the Nail Polish Gods are just toying with me at this point). But it is a "sparkle" and hence a different texture/finish than the rest.

Definitely more of a classic red creme (not actually as dark as I was expecting with "deep" in the name) but with a hint, and I do mean a HINT, of sparkle. Still pretty though, and I think my polish of choice for this year's December 25th!!!

APPLICATION

- 2 coats on top of Orly's glue basecoat for easy swatch removal.

This could be a 1 coater, had I not had long nails and a free edge to cover. Super smooth application, no complaints here!

Seventeen Colour Carnival

Are you a big fan of glitter during this month?

What's your favourite coloured glitter to wear? Or the most unusual you've worn?

Have you come across a glittery red? If so, I need NAMES people!!! Don't be shy, you are my eyes and ears out there! :P


xxxemma

Follow

Essie Autumn/Fall Collection 2016

Essie Autumn Fall Collection 2016

When you first see this Japanese inspired Collection, autumn is not the first thing that comes to mind (except for Playing Koi...that one screams autumn leaves); but I don't hate it! Yes, there are a few more pastels than you would traditionally expect when going into the "dark nail polish" season that is autumn/winter, especially compared to last year's Essie Autumn Collection. But surprisingly, Go Go Geisha (the dusky pastel pink) has barely left my nails.

Purchasing this Collection, I forewent the purple Kimono-Over a) because it's a bit too dark for me and b) I still adore the purple that is Shades On from the Essie Spring Collection. Nor did I pick up Now And Zen (I'm not a big fan of greys on my nails) or Maki Me Happy (too many reds/berries in my collection to justify another one).

So I only really have three polishes to show you, but I still think you get the "waking up in Tokyo" vibe that Rebecca Minkoff (Essie's Global Colour Designer) was initially going for...anyone else now have that Hilary Duff song Wake Up stuck in their head? Just me? Okay, moving right along...

Essie in Udon Know Me (Autumn Fall 2016)

Essie - Udon Know Me (Autumn/Fall 2016)

First up is this "mysterious stony blue", a.k.a. a light blue with a bit of grey to it. In the bottle it looks similar to Maximillian Strasse Her, but when swatched next to each other (comparison swatches below) you can see that the latter has a lot more grey to it (and a bit of sage) hence why it appears way more muted than Udon Know Me. Furthermore, Who Is The Boss, a lighter version still of Maximillian Strasse Her also has a bit too much of a green quality to be comparable in hue to Udon Know Me.

P.S. Fan origami tutorial here.

APPLICATION

- 2 coats on top of Essie's Grow Stronger basecoat

This applies like a dream, smooth and almost a 1 coater. I personally applied 2 coats just to be on the safe side and cover any patchiness/nail length since I had long nails at the time.

WEAR

Impeccable wear time, I wasn't expecting much as I had applied it as a full manicure on long nails (had it been an OPI polish that would have meant chipping by the next day cough...cough...The I's Have It) but 4 days later and I was still CHIP FREE!!! Now I know some of it has to do with body chemistry and blah...blah...blah but this polish managed to last 4 days on my nails and need I remind you how heavy handed I am? Plus, my nails tend to peel, so this is quite a feat!

REMOVAL

I was essentially removing a near perfect polish on day 5 (maximum I can last before I get bored of the colour). As with any creme polish, super easy removal too!

An all-rounder polish really (smooth application, long wear time and easy removal), highly recommended!

Essie in Go Go Geisha (Autumn Fall 2016)

Essie - Go Go Geisha (Autumn/Fall 2016)

This is described as an "antiqued blossom pink", it's basically the pink version of Udon Know Me, i.e. a light pink with a bit of grey to it. This dusky pink is certainly quite the chameleon, in some lights it can look very pink, in others slightly mauve and still in some lights it appears like a nude (giving the mannequin hand effect). But swatched next to an actual mauve polish like Essie's Lady Like and a more nude brown polish like L'Oréal's Rose Bagatelle you can see just what a unique shade of pink Go Go Geisha is.

My personal favourite of the Collection (although Playing Koi is a close second), and no...not because I instantly knew how I wanted to photograph it (hello origami umbrellas and my first ever watercolour #proud) but because much like the polish above, it's another #spoileralert all-rounder polish.

P.S. Umbrella origami tutorial here and original photo by Dade Freeman of the Geisha that I copied here (amazing photography, check it out!).

APPLICATION

- 2 coats on top of Essie's Grow Stronger basecoat

Again, almost a 1 coater. I've applied this polish twice as a full manicure; the first time I had patchiness on only my ring finger, so I applied 2 coats to all. The second time I had patchiness/streaks on almost every nail (I think I must have done a lighter coat) so again 2 coats were necessary. But otherwise super smooth and easy application.

WEAR

Yap you guessed it, another great wear time! Again, I had long nails (was growing them out for this post) and I had one minor chip on day 3 (because my thumb nail unfortunately peeled) but otherwise it was pretty perfect manicure until removal time.

REMOVAL

It's an all-rounder polish so as you can imagine, removal of this light dusky pink creme was super easy too.

Essie in Playing Koi (Autumn Fall 2016)

Essie - Playing Koi (Autumn/Fall 2016)

Labelled as a "flirtatious orange rust" this very brown tinged orange is the perfect colour for autumn. One of the hardest colours to photograph/correct (reds are notoriously difficult) in some lightings it can look quite orange and others quite brown. If you only apply 1 coat of this polish (too patchy for me to recommend this) then it really is a much brighter orange, but with each coat the colour deepens quite a bit towards a darker browner hue.

I've compared it to the only brown nail polish I own, which is L'Oréal's So Chic Fox (disregarding the ones that look almost black like Essie's Chocolate Cake), and you can see just how orange it is in comparison (see below).

I really love the name of this one (I just had to paint some koi carp to go in the photo, although after re-reading the art I copied here...these fishies might in fact be goldfish #facepalm...oh well we can just pretend I didn't have a blonde moment (nothing against all the blondies out there) and say they are koi...nods innocently. ;)

Luckily for me my Dad loves Japanese porcelain, and when I saw this plate I knew it would be a match made in Heaven, as you can see it's basically the colour scheme of this entire Autumn Collection.

P.S. If you thought eating with chopsticks was hard, trying to photograph your nails "prettily" while keeping them balanced and uncrossed is a whole different ball game.

APPLICATION

- 2 coats on top of Essie's Grow Stronger basecoat

As I mentioned above you could go for 1 coat, but it would give you a very patchy/streaky effect (it's a look though). The first time I applied it I think I did quite thin coats and needed 3 for total opacity. The second time I applied it (for the swatch photos) I did slightly thicker coats and only needed 2. Nonetheless creamy and effortless application.

WEAR

Ugh...I don't know what happened with this polish, but I put this on as a full manicure before my bath (big mistake...HUGE!!!), and the polish had peeled off at the tips after it. I'm assuming this is just a fluke down to user error though (but I did wait a couple of hours before having said bath).

This is why I usually wait till before bed before applying any kind of polish...that will teach me for deviating from plan. The second time I wore it, was just for the swatch photos so I have no idea how long this polish actually lasts in "normal conditions". Hopefully like the other ones it's another long wearer; fingers crossed!

REMOVAL

Relatively easy removal, it does act like a red creme though so be careful about skin/cuticle staining when removing. My technique of pressing a tissue soaked in remover on the nails for a good 15 seconds before swiping off usually prevents any of that fussing though (and a cotton bud to remove any leftover on the cuticles).

Essie Autumn Fall Collection 2016 Comparisons

There you have it, this year's pretty unique Essie Autumn Collection.

What was your favourite colour from this Collection?

Were you expecting such an untraditional Collection this autumn?

Have you been lucky enough to travel/experience Japan, what were some of your favourite things?

If Essie was to do a collection based on where you live, what colours would you like to see represented?

さようなら (Sayonara!)


xxxemma

Follow

Essie Summer Collection 2016

Essie Summer Collection 2016

We are fast approaching the end of the summer, but before we bid "Adieu!" to those last warm sunrays...I know, surprisingly we had pretty decent weather here in Belgium...I thought I would show you the couple of polishes I did pick up from this year's Essie Summer Collection.

Now, in my Essie Autumn/Fall Collection 2015 I might have been a bit hasty when I said that I wasn't a big fan of dark and navy blues, since this year I seem to have amassed quite the dark blue collection with Aruba Blue (from Essie's permanent range) and now Loot The Booty! I've gotta say though, I do own a gorgeous matching blue eyeliner which I think is what swayed me (featured here and here).

I also picked up Viva Antigua! which from the moment I saw it mentioned on EssieEnvy's website here, I knew I had to have it! But enough of the chit-chat...swatch time!

Essie in Viva Antigua! (Summer 2016)

Essie - Viva Antigua! (Summer 2016)

Viva Antigua! is a beautiful turquoise polish with a duo-chrome micro-shimmer (or flakes? Not sure how to describe it) in light mint and gold (an unusual combo since turquoise is often paired with silver micro-shimmer). I have nothing quite like it in my collection, the closest polish I could compare it to (see below) was Mojito by BE Creative Make Up (which I got free recently as a B-day gift because I'm a member of Ici Paris XL). But Mojito is solely a cream and it's closer in colour to the light mint of Viva Antigua!'s micro-shimmer than its darker turquoise base.

N°7's Paradise Love, although quite similar to Viva Antigua! when in the bottle, is actually just a turquoise and mint micro-glitter in a clear base. Hence, Viva Antigua! is unique to my collection and I couldn't be happier!

APPLICATION

- 2 coats on top of Orly's glue basecoat for easy swatch removal.

In my original photos you could clearly see the nail length with just 2 coats (removed in Photoshop for a more accurate depiction of the polish). But IRL this polish is fine with just 2 coats, especially if you have short nails. If I was to retake photos on long nails though, I would probably add a 3rd coat to be on the safe side.

WEAR

I've already worn this as a manicure, with such a pretty colour who could resist?! As usual, I apply my polish before bed, so the next day is what I consider to be the 1st day of wear. With Viva Antigua! I got minor chipping on the index and middle finger of my right hand (dominant hand) on day 2; not bad, but not great either.

REMOVAL

To remove polish my technique is usually to hold a tissue soaked in nail polish remover over my nail for approximately 10 seconds and then swipe off. Afterwards I go around the missed edges with a cotton bud soaked in remover.

However, for this polish, removal was a bit trickier. After the first 10 seconds only the turquoise (base) colour comes off, you then need a further 10 seconds with a bit of rubbing as you swipe off to remove the more difficult micro-shimmer. This does also mean your nail surface gets a bit damaged and scratched, but not nearly as bad as with a real glitter polish.

Furthermore, after removing Viva Antigua! my nails were stained! This is the first time this has ever happened to me as usually my nails never stain (mainly because I ALWAYS wear a basecoat under my polishes). But once I washed my hands and used my nail brush cleaner (featured here) my nails were pretty much back to their normal colour.

All in all, a bit of a faff to remove but it's certainly not enough to dissuade me from wearing this colour again...and again...and again! Did I mention how pretty it was?! :P

Essie in Loot The Booty (Summer 2016)

Essie - Loot The Booty (Summer 2016)

Loot The Booty is a gorgeous royal blue polish with a duo-chrome micro-shimmer (or flakes?) in purple and a lighter blue. Unfortunately, this micro-shimmer is not as apparent on the nail as Viva Antigua!'s but when the bright sunlight hits it, you do get the full effect!

I've compared Loot The Booty to the aforementioned Aruba Blue, which as it is also a royal blue is pretty similar in colour, but the finish is completely different! The latter is a pure shimmer hence it has more of a metallic effect/sheen than the duo-chrome sparser glittery effect of Loot The Booty. I could personally justify owning both, but if it is just the colour you want then go for either; both have lovely formulas to apply. Although when talking about removal (see below) Aruba Blue might be at a slight advantage (easier).

APPLICATION

- 2 coats on top of Orly's glue basecoat for easy swatch removal.

WEAR

I haven't worn this as a full manicure, so couldn't say.

REMOVAL

Because Loot The Booty has micro-shimmer in it like Viva Antigua! I'm suspicious that it probably behaves the same way when it comes to removal i.e. harder than a cream but not as bad or damaging as a glitter polish.

Essie Summer Collection 2016 Comparisons
Essie Summer Collection 2016

There you have it, my top picks from this year's Essie Summer Collection...for a full collection review with swatches I would always highly recommend Imabeautygeek's posts here.

Which colours did you pick up from this collection?

What are your favourite foods to eat during the summer? This pineapple and watermelon combo might be aesthetically pleasing but it was one Hell of a sticky mess to clean up...suffering for my art people! At least no wasps disturbed me, so always a plus!

I'm off on my summer vacay now, yay!!! I would feel sorry for everyone starting school, but I did my time...and Dobby be FREEEEE!!! Please don't hate me...you'll understand when it's your turn, I promise!


xxxemma

Follow

OPI Alice Through The Looking Glass Collection

FINALLY!!! I hear you cry! I know, I've been rather late on this one...but hopefully the pretty pictures will earn me your forgiveness. :P When OPI announced that they were releasing an Alice Through The Looking Glass Collection I was super excited, mainly because I missed the initial Alice in Wonderland Collection of Spring 2010. Granted I wasn't paying that close attention to nail polish collections back then, and I had not yet discovered Essie...I know shock horror; see how far I've come (wipes away proud tear). But this time I caught the bandwagon, YAY!!!

I personally only bought OPI's mini Royal Court of Color set because I loved every colour and I thought it was an excellent representation of the collection (which isn't always the case with the OPI mini sets, but they can't account for everyone's tastes, so that's totally okay).

Down the rabbit hole we go...

OPI in The I's Have It (Alice Through The Looking Glass Collection)

Get it?! Get it?! I drank the "Drink Me" concoction and suddenly became a giant (although the mini size of the OPI bottle does spoil the effect somewhat)! Who knew the mini pack of cards I got about 10 years ago would actually come in handy (they were just so cute I couldn't bring myself to throw them out and now I'm glad I didn't). I know, you're going to tell me that all this isn't actually technically from Alice Through The Looking Glass, but rather Alice in Wonderland; but let's not get picky. ;)

OPI in The I's Have It (Alice Through The Looking Glass Collection)

OPI - The I's Have It (Alice Through The Looking Glass Collection)

OPI released two blues in this collection and although I originally thought that this blue was the most similar to Alice's powder blue dress (in the Disney animation). After looking up images, OPI is right and the slightly darker blue of Fearlessly Alice is a much better match. However, I much prefer the lighter blue that is The I's Have It, even if it isn't technically Alice's dress colour. It is what I most associate with it (even if I'm wrong) so I'm happy they included the lighter blue one in the mini set.

OPI describes this colour as a "light powder blue", personally for me a powder blue has more of a grey tone to it, so I would say that The I's Have It is really more of a bright sky blue really. Either way it's gorgeous!

APPLICATION

- 4 coats on top of Orly's glue basecoat for easy swatch removal.

This one is a pain in the butt to apply! It was very streaky on the first 2 coats, for the 3rd coat I had to load the brush with polish and quickly and gently apply the polish while simultaneously keeping the brush close to horizontal with the nail. I'm not sure if it's the stiffness of the brush or if it's because I'm heavy handed, but without this technique you just end up pulling/scrapping off the previous layers (I've never experienced this problem with Essie brushes). For the 4th and final layer, I let my nails dry for a good 10 minutes before repeating the same technique as for the 3rd coat. The final two layers do smooth out the initial streakiness and self-levels nicely, and no bubbles! If I was to apply an Essie polish, even though the brushes are more supple, at 4 coats I'm almost certain to get bubbles (different and thicker formula most probably the culprit), it's a no-win situation unfortunately.

WEAR

I have tested this one out twice as a full manicure (I love the colour that much), both times on long nails. To be completely honest this polish has an awful wear time, which is a real shame when you have to go through such a kerfuffle for application.

As I've mentioned before in previous nail posts, I always apply my nail polish before bed, and I got a major chip on my ring finger of my non-dominant hand the very next day (i.e. 1st day of wear). I hadn't done any particular manual jobs that day either. On the 2nd day of wear, the chip had become so bad (half the nail polish had come off) that I had to repaint the nail that morning, I was thinking it was a fluke since it was only on one nail. However, by the evening of the 2nd day, three more chips (small this time) had appeared on other nails and another major one on my middle finger (dominant hand this time). By day 3, I had to remove the manicure it was so bad!

The second time around, the manicure started to chip the 2nd day, again really wasn't impressed! This lack of longevity could be due to the fact that both times I had long nail, which we all know makes chipping more likely. But I think the formula and the fact that you need 4 coats is probably more likely to blame.

REMOVAL

Like any other creme nail polish though, super easy removal.

OPI in I'm Gown for Anything! (Alice Through The Looking Glass Collection)

OPI - I'm Gown for Anything! (Alice Through The Looking Glass Collection)

I'm late! I'm late! For a very important date! No time to say "hello", "goodbye"! I'm late! I'm late!! I'm late!!!

I know tea-time is very important to us Brits (we never actually do find out what the rabbit was late for) and the perfect colour to wear for one is definitely this pale "creamy lilac" (I don't contest OPI's description for this one).

APPLICATION

- 3 coats on top of Orly's glue basecoat for easy swatch removal.

Having learnt from my mistakes, I was sure to let I'm Gown for Anything! dry for a good 5 minutes between layers (as opposed to starting the 2nd coat immediately after finishing the last nail of the 1st coat). This prevented the whole pulling/scrapping of the previous layers. However, like with The I's Have It, the first 2 coats are quite streaky, so it really does need the 3rd coat which also self-levels beautifully.

WEAR

I haven't tested this one out as a full manicure yet, so I don't know if it behaves as badly as The I's Have It.

REMOVAL

Again, I haven't worn this as a manicure, but I'm sure like any other pastel creme nail polish it has super easy removal.

OPI in Oh My Majesty! (Alice Through The Looking Glass Collection)

OPI - Oh My Majesty! (Alice Through The Looking Glass Collection)

Checkmate! I kid, this polish is described by OPI as a "pearly alabaster". Now because I had to bump up the brightness of the picture so much in Photoshop for it to not have a grey background (it was sunny when I took the photo I swear!) I unfortunately also lost the reddish pearlessence originally captured. Basically, if OPI's Alpine Snow and N°7 Pearly Pink had a baby it would be Oh My Majesty! (see comparisons below). The pearlessence in this polish is not the typical silver pearl you come to expect from a frosted polish, but way more of a red/orange warm sheen to an otherwise fairly standard white nail polish. It really is quite beautiful! Definitely my favourite from the set; you can find a better and more accurate swatch from Imabeautygeek here.

APPLICATION

- 4 coats on top of Orly's glue basecoat for easy swatch removal.

I repeated the same technique as for I'm Gown for Anything! (letting it dry for 5 minutes between layers) but as the polish is a pearl and not a creme polish, which makes it more translucent, it did require a 4th coat for full opacity.

WEAR

I haven't worn this as a full manicure yet, but because of its pearlessence the polish has more of a gel-like finish, which I think might make it last longer than the typical OPI creme. But this is pure speculation at this point. :P

REMOVAL

Haven't tested it out yet. But as a pearl polish, removal is in no way comparable to a glitter polish (as a pearl is more of a sheen) and should therefore still be rather easy.

Painting the roses red, We're painting the roses red, We dare not stop or waste a drop, So let the paint be spread...dum...dee...dum...dee...dum We're painting the roses red!

Sorry I just couldn't resist! You'll at least have one Alice in Wonderland song stuck in your head by the end of this post, I can guarantee it! I would feel bad but you're only just getting a drop of my Disney lunacy, so count yourself lucky! ;)

OPI in Having a Big Head Day (Alice Through The Looking Glass Collection)

OPI - Having a Big Head Day (Alice Through The Looking Glass Collection)

Described as a "hot red" it is quite a dark red but by no means is it a burgundy! Having a Big Head Day is just not the bright poppy red I expect when I hear "hot red". Still a gorgeous red though, and if every nail polish collection out there didn't already carry at least one red I might be more excited. But if you're just starting off your nail polish collection and are lacking in the classic red polish, then by all means try and get your hands on this one.

APPLICATION

- 2 coats on top of Orly's glue basecoat for easy swatch removal.

Oh what a relief this formula was! Much less streaky than the others and a bit more crelly-like in formula (hybrid between a creme and a jelly), it just glided on! No visible nail line after just 2 coats either, a true pleasure! Bravo!!!

WEAR

I haven't worn this as a full manicure yet so even though it was amazing to apply, wear-time might be a whole different story, I just don't know...sorry!

REMOVAL

While applying this for the swatch photos I did get some on my cuticles and skin, removing the unwanted excess did leave a bit of a red stain, but this is nothing unexpected when it comes to red nail polish. Plus, as it's rather crelly-like I would think that removal is rather easy too.

OPI in Having a Big Head Day (Alice Through The Looking Glass Collection)

OPI Nail Art using Alice Through The Looking Glass Collection

This is the first time I'm including nail art in my swatch posts. This is mainly because I really like the look of a pure block nail and also because nail art is very time consuming and your dominant hand always looks rubbish in comparison to the non-dominant one (hence why I only did it on my left hand to show you...sneaky...sneaky).

As a base I used 2 coats of Essie's Ballet Slippers...I know using an Essie while showing an OPI collection...Off with her head!!!

Then I used all four shades from this set to create a French tip on each nail using a nail art brush (I did at least 3 coats for each). On my index and pinky I used Having a Big Head Day, on my middle finger The I's Have It, on my ring finger I'm Gown for Anything! and finally on my thumb Oh MY Majesty!

Then I added little heart accents on my ring finger (Having a Big Head Day and Oh My Majesty!) and thumb (Having a Big Head Day and The I's Have It).

Super simple and pretty! Don't be fooled, it's still time consuming though. :(

OPI Alice Through The Looking Glass Collection Comparisons

There you have it, my swatches of the OPI Royal Court of Color from the Alice Through The Looking Glass Collection. Hope you enjoyed this Disney-fied post, I certainly had fun taking the photos (editing...not so much).

Have you picked up anything from this collection? If so which ones? And how were the formulas?

What is the most time-consuming nail art you've come up with, or tried to recreate?

What Disney collection would you like to see OPI do? Personally, my favourite has always been The Little Mermaid but the new Disney Beauty and The Beast with Emma Watson (as Beauty not the Beast, just to be clear!) is coming out soon...so maybe that one, hint hint OPI! :P


xxxemma

Follow

What's in my Nail Kit?

Nail Kit

I think if you're any kind of beauty obsessive like me, then you'll know that a good skincare routine is essential to good looking skin. Similarly, a good nail care routine will keep your nails looking fresh and healthy even without nail polish (gasp...why would you choose not to wear all those pretty colours!).

Some of these products in my nail kit are fairly new to my routine (Orly's glue basecoat for example, since swatching for my blog is a recent development :P ) but for the most part these products and tools have been with me for almost a decade, and that's saying something!!! (obviously the products haven't been with me for a decade; that's just gross, and they would be so out of date by now! I meant that I've gone through many containers of the same product).

First though let's talk about nail history. Throughout most of my teens I sported long nails, as an ex-nail biter (I know, look how far I've come! You can do it too!) thanks to the first set of braces I had when I was 11 (you heard correctly, I needed to have a second set put in when I was 14-ish because the first orthodontist messed-up) which made it too painful on my teeth to bite. So there you go, braces are good for fixing your teeth and your nervous nail biting habits as well. :P

Now though I much prefer short nails (way more practical), what you see in the photos is what I would call long: I've found that slightly longer nails look better in swatch photos for me anyway (I know I won't be breaking any Guinness World Records any time soon). With this in mind, I've noticed that my nails peel a lot more frequently than they used to, which is I'm sure explained by the fact that I always have polish on my nails (I'm just happy I don't suffer from polish staining) which is something I only really started when I was 17. But I also used to wear a lot of black back then, so I'm still in my "having fun with colour" phase of my life, and why not?

NAIL POLISH REMOVER

First up, nail polish remover! Now back when I painted my nails very rarely, my go-to remover was the Mavala one from John Lewis, but I stopped using it when I couldn't get my hands on it as easily due to fewer visits to the UK and I was using up my bottle more quickly because I was starting to wear polish more often. Then I started using random removers until I came across my favourite one; the Bourjois Gentle Nail Enamel Remover (which doesn't seem to be available in the UK but which I buy from my local Di), which unlike most removers smells like sweet berries (with a hint of the characteristic smell of remover though). Because it's acetone-free it is less drying for my nails in the long run, but it doesn't remove polish as easily as my alternative choice Maybelline's Dissolvant Express (which I buy it in my local food supermarket; Delhaize). So I do use both depending on the difficulty of the polish (I wouldn't attempt to remove a glitter polish with the Bourjois one, that's for sure!).

COTTON BUDS

Now I do tend to use tissues folded in four with my nail polish remover (I don't like cotton balls because of that scratchy feeling...you know like chalks on a chalkboard...shudders) but for the nooks and crannies that are the cuticles (since I do apply polish by flooding my cuticle most of the time) I just soak a cotton bud in remover and eliminate any left-over polish that way. And of course, because I'm just that sad, I do have my favourite cotton buds (in my defence some just lose their cotton halfway through trying to remove a polish because they're not glued on properly). In the UK I used to use the Johnson's Cotton Buds but in Belgium I buy the Lotus Cotton Buds, both equally good!

NAIL BRUSH/CLEANER

Once that's done, I go in with my Boots' Clear Nail Brush and soap to clean any remaining polish remover and dirt from under my nails. I know some people like to purposely use remover before applying polish to dry out the nail for a better polish "grip", but as I've said before, my nails peel, so hydration is key for me and personally with a good basecoat, polish "grip" shouldn't be an issue. But to each their own, if it works for you, then by all means don't let me stop you!


Cuticle Pusher

CUTICLE PUSHER

This is one of those of those tools that I've literally had for a decade now, I got this particular cuticle pusher (similar here) in a mini Nail Kit from Marks and Spencer (similar here) when I was just 14. I used to carry this kit in my school backpack for any nail-snagging emergencies (back when I had long nails, this was an issue) and it became known in my class that I always had this kit on hand. The number of times friends asked me to borrow a tool (usually the mini nail file or mini nail cutter), girls and boys alike, would astound you! An incredibly handy kit to have (plus it easily fits in a handbag if you've outgrown your schoolbag).

A major tip when using a cuticle pusher is to use it after a shower or bath when your skin has softened and is more malleable, it's a much more pleasant process than the painful one that occurs if you haven't soaked your hands in advance.

Cuticle Cutter

CUTICLE CUTTER

When I seriously got into nail care I knew I needed a cuticle cutter, but back then it wasn't as obvious what that was exactly, and I ended up with some kind of weird mini two pronged fork attached to the other side of a cuticle pusher (currently fallen behind my heavy dressing table...RIP); and I still have no idea how THAT was meant to work?! Other "cuticle cutters" just look like plain scissors, which again, NO! What you are looking for is something similar to the picture above, they kind of look like scissors, but aren't, and are just dull enough to only be able to cut cuticle skin and not anything more.

I always use a cuticle cutter straight after I've used a cuticle pusher (while my skin is still soft from the warm water used prior), you want that little amount of skin to be free from the nail (it's usually that transparent bit of skin that tends to cover the half-moons on your nails) and easily grabbable by the cutter (once it's been pushed back by the pusher) to then cut away. Again, your skin should be softened beforehand by warm water to avoid pulling anymore skin that necessary. In the photo above, you can see that I have a little bit of excess cuticle on my half-moons, but I didn't deem them "long" enough to cut, you really only need to cut your cuticles once a week, if that! Otherwise, you're not cutting cuticle skin and you don't want to give yourself an infection by cutting too far (gross I know! But it can happen, especially if you don't know what to cut or how to cut the excess skin properly).

Nail Scissors

NAIL SCISSORS

Ok so these might not technically be nail scissors, I think they're meant to be dressmaking scissors, they're small and have straight blades (similar here) but I personally don't like the rounded effect of true nail scissors, I feel like they give me less control over the final shape of my nails (I like a squoval shape; a rounded square shape basically) and since I always file my nails to get that shape, the sharp edges created by straight scissor blades always get softened down. If you don't file nails, I can see how rounded scissor blades are better as they give you zero snagging possibilities in just one cut. But this really is down to personal preference. :P

Nail File

NAIL FILE

Personally, I don't understand those cardboard nail files that seem all the rage, they are very gritty and tear the nails more than anything (plus you have to keep buying new ones), and with someone with peeling nails already they're really not ideal! I've been using the Pfeilring Nail File (similar here) for easily ten years now (my mum introduced me to it as a kid), and I've only just recently bought a new one because my old one was getting a bit dull (used once a week for ten years that's some serious bang for your buck!).

When I was a teen and still sporting long nails I preferred a crystal nail file (similar here) because as the "grit" is more finely milled it doesn't take off quite as much from the nail on one swipe as the metal nail file does (minute distinction but when you're trying the maintain long nails it makes all the difference). But since I'm rather heavy handed these crystal nail files seemed to be a bit too fragile for me; I broke one while filing my nails, accidently stepped on another, so this is technically my third one (and twice the price of the metal one I might add). It has only lasted me this long because I rarely use it, what with my short nails and all that! So the metal one it is!

Contrary to cuticle pusher and cutters, it's best to file your nails when they aren't softened by warm water. The nails give more resistance to the file that way (especially if your nails tend to be bendy like mine) and are much easier to file. Once finished I like to wash my hand with my Nail Brush again to remove all the nail powder that happens when you file nails.

BODY BUTTER

Next comes hydration. I've lost count of the number of hand creams I've tried over the years and none have worked as well as The Body Shop Body Butters. I always apply my "hand cream" before bed, and I still remember the one that made my hands unusually greasy and sweaty all of the next day even after washing it off (not quite what I was going for when I was looking for "hydration"). The Body Butters changed all that, I think I had run out of said random hand cream and still had a tub of Body Butter on hand to moisturise my legs after shaving (check out my Winter Saviours post for more info) and I just used that. A pure miracle I tell you!!! It didn't leave my hands greasy at all and moisturised them perfectly! I've since tried The Body Shop's purpose made hand cream (in their Christmas limited edition Glazed Apple), and it's not quite the same level of hydration, but it works fine.

Now not all Body Butters are made equal; some tend to be thicker than others. I've noticed that most of the citrusy scented ones are slightly thinner in consistency, which makes them a tad less hydrating (great in the summer when you don't need much extra hydration), but the Strawberry one has a very thick consistency which is perfect for the winter. I apply mine every night before bed (I adjust the scent and hence consistency according to the season) and I have perfectly smooth hands for the whole day. The Body Shop also sell them in small tubs, so packing and travelling with them is no issue either!

As you can see in the second picture above (it should be flipping between images) I focus my cream on my cuticle area (as well as my knuckle area), this saves me from having to buy any cuticle oils, though I must admit I'm very tempted to try out the Essie Apricot Cuticle Oil, but really I have no need for it.

P.S. My brother and father have also asked to use my Body Butters when their hands have been particularly dehydrated in the winter, and they both loved it as much as I did.

NAIL STRENGTHENER/BASECOAT

As I've mentioned before I have rather weak and peeling nails, so Essie's Grow Stronger (now discontinued and which I’ve replaced with Essie’s Strong Start) basecoat has been a nail saviour for me. I've tried the OPI Nail Envy too and although good (I have yet to try the new formula), I've noticed a bigger difference in my nails when I use the Essie strengthener. Plus, because I mostly like to use Essie polishes (I'm loving their new and improved formulas that they've had in their latest collections; at least for the last two years) the Essie Grow Stronger meshes well with their polish formula duh...same brand! and it provides all the extra "grip" an Essie polish might need to last longer.

I use Essie's Grow Stronger before any nail polish application as a basecoat; it can also be used as a treatment which is how I initially used it when I first discovered it and my nails needed it the most. I generally only apply fresh nail polish (and hence basecoat) after I've washed my hair (I'm heavy handed and this means I'm less likely to give myself chips as I have at least 4-5 days between hair washes...dry shampoo people!), in the evening before bed and before I've applied my Body Butter (above).

PEEL OFF BASECOAT

When I started doing swatches for this blog (especially with the glitter polishes from the OPI Starlight Collection) I had heard about DIY glue basecoats that peel off your polish easily, but while browsing Di, I found this Orly One Night Stand one (not too expensive and one of the few on the market anyway, so why bother with a DIY) so I decided to give it a go. Needless to say, it's hopeless if you want your polish to last (1 warm bath and my polish was slipping off) but for swatches it's Heaven! Now I can apply polish, photograph and peel in a short amount of time without endlessly damaging my nails with polish remover or having to inhale that smell repeatedly either (the polish fumes are enough thank you!).

When I use this Orly basecoat I DON'T apply my Essie Grow Stronger beforehand as it needs to be in direct contact with the nail to be able to peel off. So all in all an amazing product, just not how it was intended to be used (glitter polish is even worse as it tends to snag on things, add to that a peel-able basecoat...just doesn't work!).

Nail Kit

So there you have it, all the tools and tricks of the trade in one small nail kit! My nail care routine is definitely thanking me with beautiful nails, when I'm not chopping them off that is!

What's in your nail kit?

Do you have a nail care routine like I do?

What is the most bizarre nail tool you've come across? Nail cutters was definitely mine, but I haven't looked back!

Do you have a specific nail treatment that you think I should try?


xxxemma

Follow

Essie Spring Collection 2016

Essie Spring Collection 2016

Spring is finally here, yay!!! Now we can look forward to all the pretty flowers making a reappearance, I kid - fake flowers all year round!!! I would say they don't attract bugs, but I've had several bumblebee incidents which lead me to believe that they might be a tad on the gullible side. But that's what happens with such pretty and realistic looking fake flowers...everybody gets confused. :P

Now when I first saw the Essie Spring Collection on EssieEnvy's website (check her out, she's got amazing and accurate Essie comparison swatches, which will have you saving your pennies before you know it), my first thought was mehhhh, but I did leave myself room to possibly change my mind (I'm fickle that way). After all, Color Binge and Apres-Chic from the previous Autumn Collection and Winter Collection respectively were not the colours I picked up first time round, but ended up being my favourites from their collections (shifty eyes...swears Essie has a mind reader in their midst...shhhhh don't let them know I suspect anything!). No but really, seeing this collection in person, I loved just how well all these colours worked together; peach, purple, green and oranges. The bouquet you see above, proves just how pleasing on the eye this colour combination can be. Although I didn't pick up Lounge Lover or Sunshine State of Mind because I don't wear orange-y colours enough on my nails to justify them. Nor did I get Pool Side Service because although a lovely greyed out turquoise, I just know that on my nails all I would see is a dark grey...not my cup of tea. But let us begin the swatches:

Essie in High Class Affair (Spring 2016)

Essie - High Class Affair (Spring 2016)

This is the perfect "mannequin hand" shade; a lovely peachy nude creme. At first, I thought it would be too similar to Back in the Limo from the Winter Collection 2014 but that one is a sheer and behaves as such; there is only so much opacity you can get out of it. Whereas High Class Affair is fully opaque on the first coat and if it weren't for its slight streaking and patchiness issues it would be a one coater no problem. But you can see it the comparison swatches (below) that although they are in a similar vein, Back in the Limo has much more yellow in it (the sheerness contributing to this yellow factor just a bit, especially in the photo), whereas High Class Affair is a bit more rose-toned, similar in fact to my Mavala polish in Rose Shell; the ultimate "mannequin hand"! I've never found a shade that complements my skin tone quite as well as Rose Shell does, plus, I still look alive while wearing it! Which we all know, is a hard thing for nudes to do. :)

APPLICATION

- 3 coats on top of Orly's glue basecoat for easy swatch removal.

As previously mentioned, this is a very opaque polish, however streakiness meant that it needed at least 1 extra coat. But because I could still see my nail length (the "white bit") I then added another extra coat for the photos. With my usual short nails though I could have gotten away with just 2 coats. It's quite a thick polish but it levels itself out beautifully and has a lovely shiny glossy finish.

I haven't worn this polish as a full manicure yet, so I can't attest to wear time or the removal process. But as it is a light creme I can't imagine it to be too difficult.

Essie in Shades On (Spring 2016)

Essie - Shades On (Spring 2016)

This is an interesting polish; sometimes it's clearly a deep purple creme other times it can look more of an indigo shade (a mix between a dark blue and a purple) either way, it is beautiful!!! I thought this would be pretty unique in my collection, but OPI's A Grape Fit! is surprisingly close albeit a shade lighter and without that touch of indigo in it (comparison swatches below). On Essie side of things, the only purple that I could compare it to is Sittin' Pretty, which is more of an orchid colour and shows just how unique Shades On is to the Essie range.

APPLICATION

- 2 coats on top of Orly's glue basecoat because I could still see slight nail length after just one.

This is definitely a 1 coater polish; it dries a bit darker in colour than it applies. A thicker polish in consistency than the usual Essie formulas which is what to expect from a 1 coater polish. However, this also means there is little risk of pooling and it makes it a very easy and malleable formula to apply. Plus, it levels nicely; no streaking or patchiness issues.

Again, I haven't worn this as a full manicure yet, so I don't know how chip resistant it is, but as a creme polish I'm sure removal is fairly easy.

Essie in Off Tropic (Spring 2016)

Essie - Off Tropic (Spring 2016)

Off Tropic is definitely the "off topic" one of the Collection (excuse the pun), no, but seriously, in a spring collection a dark forest green creme is the last colour you would expect. But I really love this unusual choice, again in goes extremely well with the colour palette Essie went with this year. Furthermore, I'm seriously lacking in the green department in my collection. I have a matte dark emerald with some green micro-shimmer in it, Revlon's Emerald City. And a more metallic micro-shimmer, Maybelline's Green Miracle, which due to its yellow micro-shimmer, changes the overall colour to a more yellow-toned dark green.

Off Tropic is therefore my only plain dark forest green and although I'm very happy to finally have one in my collection, I think I'll get way more use out of it come autumn time. But all polishes can be worn year-round, I'm just being realistic with myself; I know that come spring/summertime all that's on my nails are pastels and bright colours.

APPLICATION

- 2 coats on top of Orly's glue basecoat because I could still see slight nail length after just one.

Exact same formula as Shades On, a beautiful 1 coater; except if taking photos with long nails, then needs 2 coats just to be sure. The 2nd coat does deepen the colour slightly from a dark yellow green to the perfect forest green, same thicker formula as Shades On and just as easy/malleable to apply. Gorgeous glossy finish!

Again, I haven't tested this one out as a full manicure yet but as a creme, removal shouldn't be too hard.

Essie Spring Collection 2016 Comparisons
Essie Spring Collection 2016

So there you have it, my picks from this year's gorgeous Essie Spring Collection.

Which ones did you pick up from this Collection? How did you find the formulas...are they all 1 coaters?

Were you just as surprised by Off Tropic being in a spring collection as I was? What is the most unusual shade you've seen in a spring collection thus far?

What flowers are you most looking forward to seeing pop-up this spring?


xxxemma

Follow

OPI Hello Kitty Collection

OPI Hello Kitty Collection

As you may know, OPI recently came out with their Hello Kitty Collection. Now although I'm personally too old to have grown up with Hello Kitty (I'm 24 people!!!), I think this Collection has less to do with nostalgia and more to do with embracing your childish side (also the Japanese cuteness factor is hard to miss, kawaii!!!). I really love all the pink hues of this Collection, but if that's not your thing they also have some unique shades to recreate the iconic kitty in all her glory as nail art (red, blue, yellow and black). However, I just picked up the pinks...forgive me!

As a side note, I also tried to get Small + Cute = <3 (I know an emoji in a name! First time for everything) but due to the restrictive UK postage laws I wasn't able to have it sent from the UK to Belgium. But after seeing exactly which colours were on offer in places like Selfridges (John Lewis has yet to receive the Collection), this shade doesn't seem to be part of the "UK" bunch anyway (nor the blue one), so I think it's okay if I just show you the ones I did manage to get a hold of (THANK YOU BeautyBay!!!): Look at My Bow!, Super Cute in Pink and Spoken from the Heart.

P.S. If you live in the UK, don't worry, you can get the whole Hello Kitty Collection from OPI UK's online store - it just doesn't seem to be widely available in actual stores. However if you live in Belgium then I can tell you Planet Parfum did not receive this Collection nor the Starlight Collection for that matter! So I would highly suggest BeautyBay for those polish needs, since you can pay in euros and there are no postage restrictions!

The New Orleans Collection has however made its way to Belgium, so you can look forward to that post coming up soon (just waiting for my nails to grow acceptably long again).

OPI in Look at My Bow! (Hello Kitty Collection)

OPI - Look at My Bow! (Hello Kitty Collection)

First up, one of the "baby pinks" of the Collection; Let's Be Friends is a very white toned pink, think Essie's Fiji (the European one) and Small + Cute = <3 is more of a true "baby pink", albeit a bit more peachy-toned. Look at My Bow! however is a light pink cream, it is just the slightest bit too blue-toned to be the perfect "baby pink". Although in some lights this polish does look more like an orange-toned pink, a true chameleon if you ask me, this one! Basically, if Essie's Lovie Dovie and OPI's Purple Palazzo Pants had a baby it would be Look at My Bow! (comparison swatches below).

APPLICATION

- 3 coats on top of Orly's glue basecoat (One Night Stand) in the photo, for easy swatch removal. I did try this one as a full manicure and it is also currently on my toes, but I did have to use 3 coats over my Essie basecoat (Grow Stronger) for those ones too.

Very much like Purple Palazzo Pants, this polish applies with a thin but opaque formula. It doesn't pool like Purple Palazzo Pants however, but you do get the same streaking effect, where only 3 coats gives the desired smooth and lovely, shiny gel-like finish.

WEAR

As I did wear this one as a full manicure I can attest that it sadly chipped the next day (I apply my polish before bed), but I think this could be a fluke, since it only chipped on one finger, and I did wash hair that day (I use my nails for that activity) and the other nails survived no problem. Plus, my toe manicure is still intact even after wearing my boots that usually rub off any manicure on my feet. So it needs further testing really; either way a top coat is sure to extends its longevity! :)

REMOVAL

Like any other creme nail polish, super easy removal.

OPI in Super Cute in Pink (Hello Kitty Collection)

OPI - Super Cute in Pink (Hello Kitty Collection)

As the name would suggest and not what the bottle would make you believe, this polish is in fact a pink! Which when you expect the more purple hue from the bottle on your nails, it is a slight disappointment! But it's a lovely colour nonetheless, so I will forgive the slightly misleading bottle. Very similar to Essie's Splash of Grenadine, almost a dupe for it in fact! You can see me wearing it in my Clinique Pansy Pop post and there is also a comparison swatch below. Along with Essie's Sittin' Pretty, Splash of Grenadine was pretty much all I wore on my nails last year. Super Cute in Pink is a gorgeous bright fuchsia colour (purple-toned pink) and I'm sure I'll be wearing this colour again just as much this year (closer to spring/summertime).

APPLICATION

- 3 coats on top of Orly's glue basecoat for easy swatch removal.

This polish performs very much like the formula in Essie's Splash of Grenadine, that is to say it has a very jelly-like consistency! Streakiness is not an issue, but visible nail line is, hence the 3 coats (I also need 3 coats with Splash of Grenadine).

WEAR

I have yet to test this one as a full manicure, but if Essie's Splash of Grenadine is anything to go by, I think I would easily get 4-5 days chip-free with this formula.

REMOVAL

Like any crelly (creme/jelly hybrid) super easy removal.

OPI in Spoken from the Heart (Hello Kitty Collection)

OPI - Spoken from the Heart (Hello Kitty Collection)

This is a beautiful bright pinky red crelly. I initially thought this might be a dupe for Maybelline's Forever Strong in 490 Hot Salsa but it is way more pinky in tone compared to that rather orangey-toned red (comparison below). This polish colour would go gorgeously with Sephora's Cream Lip Stain in 03 Strawberry Kissed, and I'm sure that's exactly what I'll be pairing it with when I do wear it as a full manicure!

APPLICATION

- 3 coats on top of Orly's glue basecoat for easy swatch removal.

This polish performs exactly like Super Cute in Pink, i.e. another very jelly-like formula! No streakiness, but visible nail line, hence it needs 3 coats for full opacity. There is still a very slight visible nail line after 3 coats but nothing too noticeable, except maybe under direct sunlight or a macro-zoom lens :P

WEAR

Again, I think this would perform like Splash of Grenadine, 4-5 day wear...to be verified!

REMOVAL

Super easy removal even as a "red" which are notoriously difficult to remove from stained cuticles. Even if I did use the easy Orly peel off basecoat and have yet to test it out as a full manicure, some polish did bleed onto my cuticles (since I do tend to flood them when applying polish), but I had no difficulty in removing the excess with a cotton bud and nail polish remover.

OPI Hello Kitty Collection Comparisons
OPI Hello Kitty Collection

So there you have it, my top picks from the Hello Kitty Collection, can't wait to get Small + Cute = <3 when I go to the UK in April (wasn't going to make you guys wait that long). My overall thoughts for this Collection...kawaii!!! Couldn't resist! :)

If you're into pinks then definitely check this Collection out (and the more unusual colours, if that's your thing). Now I'm off to practice drawing Hello Kitty on my nails...disaster waiting to happen I'm sure (but if it even remotely looks like a cat, I'll be happy!) :P

What is your favourite colour from this Collection?

What's your all-time favourite baby pink?

What would feature in your ideal nostalgia Collection?...Spice Girls anybody?!

P.S. If you want to get your hands on the gorgeous bows you see in the photos (not the yellow ones, that was just knotted ribbon) then I can highly suggest this eBay seller. Be careful though when selecting your bows as some have a brooch pin on their back and others have a pin curl pin, which I personally found the easiest to slide into the hair just above an elastic or a kirby grip (also known as a bobby pin, in case my American peeps have no idea what I'm talking about).


xxxemma

Follow

Essie Winter Collection 2015

Essie Winter Collection 2015

So this might be a tad late...but who cares, look at all my pretties! No, but honestly, I was drawing a major blank when it came to a "wintery" background for this Collection, so I finally just gave up and took the idea I had for the snowflake gingerbread biscuits I didn't end up making (you will never know muahahaha...well until next winter that is!) and I ran with that! For my southern hemisphere friends out there, you can still look forward to this Collection coming out soon, in the meantime check out my post on their Autumn Collection...it's a good one I promise!

But I digress: from this Winter Collection I omitted buying Peak Show because it's just too similar to our European Fiji, and I get little wear from that polish as it is (it's way too pale of a pink for me) so I wasn't about to waste more money, and I got three from the Collection in the mini format from Essie's Winter set: Virgin Snow, Shall We Chalet and Haute Tub. Although I did immediately buy a full bottle of Virgin Snow; what can I say, pale lilacs are my weakness! But as I bought these polishes as soon as they came out, back in November (I know, don't kill me), I didn't feel at the time like Apres-Chic would be a polish for me, but come January; a silver metallic micro-shimmer was all I craved and needless to say this polish quickly became my favourite from the Collection and the one I've bought a back-up of already.

Essie in Apres-Chic (Winter 2015)

Essie - Apres-Chic (Winter 2015)

As mentioned above, this is a gorgeous silver micro-shimmer, one-of-a-kind in my collection. The only one I could compare it to (comparison swatches below) was Ciaté's Shady Lady which is more of a gunmetal grey than a silver. Winter is always a tricky collection, because on one hand you've got the festive season which is reds and glitters galore (OPI smashed it with their Starlight Collection there), but come January/March (February is easy it's #ThinkPink month with Valentine's Day looming) it's still technically winter, what do you wear? Well I think Essie answered that with Apres-Chic and Virgin Snow (up next). This silver polish has definitely matched my mood this "second half" of winter, when all I've been craving is a more minimalistic look with nude lipsticks, a monochrome outfit and "grey" nails with a flash of sparkle. If you pick up one polish from this Winter Collection, make it this one!

APPLICATION

- 2 coats on top of Orly's glue basecoat for easy swatch removal.

This polish is almost a 1 coater but with a few bald spots here and there, it needs the 2nd coat for complete opacity. Because it's a metallic though it leaves faint brush stroke marks, but they aren't too noticeable and appear more as faint nail ridges than the dreaded "a kid painted my nails" look some brush stroke marks can give. If it really bothers you though you could always sponge on the last layer, I just don't think it's necessary. :) It has a slightly dull finish, but the micro-shimmer gives it all the pizzazz it needs, plus a high shine polish would have detracted from the sparkle.

WEAR

As I've been so obsessed with this colour I've worn it as a manicure multiple times (sometimes back-to-back, which is a rare occurrence for any polish) and I can attest that on long nails it chipped after 1 day, but with my usual short nails I got 3 days wear, chip free! I'm sure adding a top coat might extend this wear time, but I'm really not one for top coats (it ends up being too many layers on my nails, especially with some polishes that require 3-4 coats...Chillato, I'm looking at you!)

REMOVAL

Easy removal for a metallic micro-shimmer, although it does leave a few flecks of micro-shimmer behind all over you fingers, simple targeted hand washing deals with that issue no problem.

Essie in Virgin Snow (Winter 2015)

Essie - Virgin Snow (Winter 2015)

This is a pale lilac creme, a beautiful shade and one I thought was unique in my collection but turns out, not so much! It's almost identical to Revlon's Charming so if you have that one, there is no need for Virgin Snow. But as my Revlon bottle has dried up and the polish is almost finished anyway (I was obsessed 3 years back) Virgin Snow came at an unknowingly perfect time (I also don't think you can buy Charming anymore). Furthermore, Virgin Snow is a tad darker than l'Oréal's Nouvelle Vague so if you're happy with a polish that is in the same tone as Virgin Snow, then again, no need for the Essie.

I was curious however how it would compare to Saltwater Happy, the knockout polish from Essie's last Summer Collection. You can see in the comparison swatches (below) that Saltwater Happy is much bluer, almost baby blue looking, next to Virgin Snow. However Virgin Snow is much more of a white based polish with a touch of lavender. Now, I didn't think they would be dupes of each other (I'm not colour-blind!!!) but they stuck out from their individual Collections in the same way to me; the cool blue/lavender-toned ones of their Collections.

APPLICATION

- 3 coats on top of Orly's glue basecoat.

The first 2 coats are a bit patchy and streaky looking, hence why it needs the 3rd coat for full opacity. Self-levels perfectly, smooth formula, easy to apply as with all of Essie's latest creme formulas...bows down to greatness!!! It also has a gorgeous gel-like (you know I'm thinking it...plastic-y!!!) finish to it.

WEAR

I have worn this one as a full manicure - it managed 3 days chip free!

REMOVAL

As with any creme polish, super easy removal.

Essie in Altitude Attitude (Winter 2015)

Essie - Altitude Attitude (Winter 2015)

A very pretty cherry red creme, Altitude Attitude is almost as dupe for Revlon's polish by that name; Cherries In The Snow. However, where Cherries In The Snow darkens with multiple layers, this one doesn't, and stays just as bright and pop-y. Not as bright and pink as OPI's Spoken from the Heart though, Altitude Attitude stays in the "classic reds" category unlike that chameleon. I also compared it to Red Nouveau, a more orange based red, and even with as much colour correcting as I could manage (reds are notorious for all looking the same in photos) the difference in tone is barely noticeable, but it is there I promise - especially in direct sunlight!

APPLICATION

- 2 coats on top of Orly's glue basecoat.

Another almost 1 coater, with long nails I could still see my nail length (the "white bit") so I felt I needed to add another coat for the photo, but if I had my usual short nails then 1 coat would have been enough. Again, it didn't deepen the colour on the second coat (which I know some polishes do). Very high shine and gel-like in finish.

WEAR

Disappointing wear time with this polish. I had short nails and this one still chipped early on the 1st day of wear (I always apply my polishes before bed) and on one of the least used fingers too; the ring finger. And there was no manual labour that could have contributed to this either. Will have to test with a top coat, which at this point is its saving grace that Altitude Attitude is almost a 1 coater, not so many layers on the nails. Needs further testing but be warned it's a chipper!

REMOVAL

Standard removal for a red (slight cuticle staining) nothing cotton buds and nail polish remover doesn't solve though.

Essie in Shall We Chalet? (Winter 2015)

Essie - Shall We Chalet? (Winter 2015)

This one is a gorgeous dark bordeaux creme (a brown based red) but it's so close to its predecessor in the Autumn Collection; With The Band, that it's too redundant to be worth the purchase (I'm glad mine is just a mini). You can see that With The Band is a touch lighter in the comparison swatch (below) but Shall We Chalet? is duped by Revlon's Bewitching which is slightly more pinky-toned but not by much. Bewitching has been my all-time favourite colour to wear on my toes (and occasionally finger nails) in the winter, so I can't fault Essie on their choice of colour in the Collection (it is one I love in the winter), I just wish I hadn't seen it a million times before. Plus, I had just bought a fresh bottle of Revlon's Bewitching in my November Bluewater shopping trip so it's not like I can't get my hands on that one anymore either.

APPLICATION

- 2 coats on top of Orly's glue basecoat.

Almost a 1 coater but one of my nails was patchy so did 2 coats. I also wanted to see if that deepened the colour...not by much. Lovely gel-like finish too.

I haven't worn this one as a full manicure so I can't say what the wear or removal process was like (as I used a glue basecoat all I had to do was peel it off).

Essie in Haute Tub (Winter 2015)

Essie - Haute Tub (Winter 2015)

Again another gorgeous polish but I've seen it before with Frock'n Roll, granted that one is an aubergine base with silver micro-shimmer whereas Haute Tub is a black base with purple micro-shimmer, the difference on the nail is nothing to write home about. If you are going to invest in a dark polish with micro-shimmer in it then I highly recommend OPI's Cosmo with a Twist, that one is really like a galaxy on your nails. With its duo-chrome micro-shimmer in blue and pink plus the fact that the micro-shimmer really shows up on the nail and isn't swallowed up by the base like Haute Tub's is, Cosmo with a Twist is just more worth it!

APPLICATION

- 2 coats on top of Orly's glue basecoat.

Almost a 1 coater but due to slight patchiness it needed 2 coats.

Once again, I haven't worn this one as a full manicure yet, so I don't know wear time or the removal process for this one.

Essie Winter Collection 2015 Comparisons
Essie Winter Collection 2015

So there you have it, the Essie Winter Collection, very mehhh when it came to Shall We Chalet? and Haute Tub, I would have liked Altitude Attitude more if it didn't chip so quickly. Overall, I would say go for Apres-Chic, the stunner of this Collection, Virgin Snow as a more unique winter colour, or even Peak Show if your Fiji isn't as faded of a pink as the European one is.

Coming up next Essie's Spring Collection (no I won't leave you guys hanging for so long for that one, the photos are already ready!!!) I can't be the only one that thought the first day of spring was the 21st :/

Which was your favourite from this Collection?

What colour would you have liked to have seen which would have been less repetitive for Essie?

What did you wear on your nails in the January/March winter months?


xxxemma

Follow

OPI Starlight Collection, Holiday 2015

Who’s excited for OPI’s Starlight Collection? I know I am!!! Miraculously, this one came out in Belgium only a week or so after the UK, so I didn’t have the dreaded month-long wait that I had for the OPI Venice Collection, woop woop!!!

OPI in Ce-less-tial is More (Starlight Collection)

OPI - Ce-less-tial is More (Starlight Collection - Holiday 2015)

Let’s start with the one which I think is the quintessential polish of the Collection Ce-less-tial is More. This is a gorgeous rose-silver polish very similar in colour to OPI’s Designer…De Better! (comparisons below) but with a micro glitter/sand finish and added flecks of slightly bigger multi-coloured glitter dispersed throughout. Basically, stardust in a nail polish…stunning!

APPLICATION

This is a very thick glitter, be warned! There isn’t much base to the formula, the glitter is densely packed and feels almost gloopy, but this means that you get a very good coverage from the first layer onwards. Since Ce-less-tial is More has quite a sandy texture it’s a very fast dryer and surprisingly the thickness doesn’t translate on the nails as much as you would think from the formula. Multiple layers even out any glitter gaps (which are bound to happen because of the clear base, even if there isn’t much of it) without adding any bulk to the nail.

- 3 coats on top of Orly’s glue basecoat, for easy swatch removal.

WEAR

I can’t talk about lasting power since I’ve only swatched it.

REMOVAL

Nor can I talk about removal without glue basecoat, which by the way I’m not at all impressed with Orly here, it only lasted a couple of hours on my nails before peeling off (because I did try to wear it as a manicure, I just haven’t been able to face the removal that would ensue without a glue basecoat), but maybe that’s user error, admittedly I could have let the basecoat dry longer. But I think that since the polish has such a sandy texture the downside is the inevitable snagging (as with all these types of polishes) and hence this probably contributed to the whole peeling palooza.

But basing myself off the only other sand polish I’ve owned prior to this one, Essie’s Lots of Lux, it’s probably going to chip easily, because of all the snagging mentioned above (however the texture of sand means that it’s very easy to repair chips as the texture automatically blends any edges you would normally have with creams) plus you could add a top coat to change the texture if that’s what you really wanted, it would last longer. But for me the texture and glitter is all part of the fun, and the whole stardust-y aspect despite the (assumed) pain in the backside removal.

OPI in Super Star Status (Starlight Collection)

OPI - Super Star Status (Starlight Collection - Holiday 2015)

Next we have Super Star Status, and this polish really is fit for the red carpet. Like Ce-less-tial is More, it has a silver micro glitter/sand colour with added flecks of slightly bigger gold glitter this time. It has a bit more clear base to it than Ce-less-tial is More but not by much, it still acts a bit gloopy, but again this just means greater densely packed glitter. Honestly this polish looks stunning both as just one layer over a nude polish, for a fresh-sparkly look and as I have it here, the “Full Monty”.

APPLICATION

Now although very similar texture to Ce-less-tial is More, the application for this one is different and comparable to the technique used to apply Baroque…but Still Shopping! (as mentioned in my previous post, plus it also has the whole silver and gold thing going on).

That is to say, for the first layer worry about getting the silver micro-glitter over the whole nail, ignoring the bigger gold glitter’s distribution for the moment. In the second layer fan out your brush by applying slightly more pressure so that you are effectively scrapping the bigger gold glitter on there, and there you have it!

- 2 coats on top of Orly’s glue basecoat.

I haven’t worn this as a full manicure, so I’m just assuming it will act like a sand too (except if you only have one layer, then it’s less snag-y because it’s thinner and will act like a glitter). And of course, be a pain to remove if you aren’t a cheater like me. Which by the way, if any of you have a good trick to remove glitter, or a great base, I need to be made aware of it. (Don’t be shy, put it in the comment section!)

OPI in Cosmo with a Twist (Starlight Collection)

OPI - Cosmo with a Twist (Starlight Collection - Holiday 2015)

Cosmo with a Twist was definitely the one I was most excited about. Now although I’m not a fan of navy blue on my nails, this one is just exceptional. It’s like a galaxy on your nails, which is just so fitting for this Collection…"n’est-ce pas"?!

Now if you follow nail polish news like I do (why do we not get our own newspapers…huh!) you may be aware that Essie is bringing back its very popular polish in Starry Starry Night (The Art Historian in me LOVES that name) which although gorgeous (I will be getting my hands on it when it come out) it has nothing on Cosmo with a Twist when it comes to the representation of starry night skies in nail polish format.

Cosmo with a Twist is a very VERY dark aubergine cream base with a duo-chrome micro-shimmer in blue and pink, and I’m really happy my camera was able to pick this up so accurately, although as with any photo the real thing is so much more outstanding!

APPLICATION

The consistency is quite jelly-like and the first coat goes on extremely thin and streaky, but the second coat deepens the aubergine colour to an almost black and leaves zero streaks. I did 3 coats, because I’m fussy and I wanted to see if the colour deepened up more (answer = not noticeably).

It’s quite fast drying because of the micro-shimmer I’m assuming. But this means it doesn’t have much manipulation time. It dries with a tiny TINY bit of texture that is not that noticeable as it’s mostly smooth. Also, it dries a bit dull, but the micro-shimmer gives it all the pizzazz it needs! Plus, you could always add a top coat to fix both issues if you really wanted.

- 3 coats, Orly glue basecoat for photos but normal base when I wore it as a full manicure.

WEAR

This one I have worn as a full manicure…twice (I told you I was excited) and it has excellent staying power. I had minor chipping on day 3 after much manual labour (setting up artificial Christmas trees and decorating them)

REMOVAL

Pretty easy, no harder than a dark cream polish usually is.

All in all, Cosmo with a Twist is exactly what I had hoped it would be and more!!! So perfect for the lazy girl that doesn’t want the faff of glitter removal but still wants something sparkly on the nails.

P.S. I know what I’m wearing for New Year’s Eve!!!

OPI in Let Your Love Shine (Starlight Collection)

OPI - Let Your Love Shine (Starlight Collection - Holiday 2015)

Finally, we have the true Christmas classic/standard of any Holiday Collection really, and what is currently featuring on my nails this Christmas Eve, Let Your Love Shine. A gorgeous deep red with red micro-shimmer.

APPLICATION

The first coat applies quite streaky though nothing quite like Cosmo with a Twist. The second coat deepens the red quite a bit from a bright ruby red to a dark garnet colour (yes there is a difference in stone colour here). It’s opaque at 2 coats, but I’m fussy and I applied 3 (again didn’t deepen the colour anymore).

Very easy application thicker than normal OPI polishes such as Tiramisu for Two (mentioned in previous post) almost jelly-like like Cosmo with a Twist, but not quite as fast a dryer. Leave this one to fully dry between layers otherwise you get dragging (mind you that was with the glue basecoat, I didn’t’ have this issue with my normal basecoat)

- 3 coats, Orly glue basecoat for photos but no base when I wore it as a full manicure and currently testing it with my normal base.

WEAR

Sadly this one chipped after two days of wear with no base (to be fair I was wrapping a heck of a lot of presents), so I’m trying it out with a base this time and hopefully it will last longer :D Although coincidently I’m unwrapping presents tomorrow, as the true scientist that I am I have (albeit unintentionally) replicated the conditions of the experiment perfectly. To be continued… Update: Unfortunately, this polish did chip on the first day of wear (I put my polish on before bed), even with a base coat on. So don't expect longevity from this one :/

REMOVAL

Easy removal, no harder than any other red cream I have come across!

OPI in Ce-less-tial is More and Super Star Status (Starlight Collection)
OPI in Cosmo with a Twist (Starlight Collection)
OPI in Let Your Love Shine (Starlight Collection)
OPI in Ce-less-tial is More (Starlight Collection)

So there you have it my selection from the OPI Starlight Collection

Which is your favourite?

What were you wearing Christmas Eve? And New Year’s Eve?

Any good recommendations for glitter removal? Or special glitter bases?


Merry Christmas and Happy New Year!!!


xxxemma

Follow

OPI Venice Collection, Autumn/Fall 2015

Finally!!! Is how I'm feeling right now. I think it's been easily two months since the US nail addicts out there have been able to enjoy this Collection. After months of going every week to visit Planet Parfum who carries OPI here in Belgium, it's finally...FINALLY released!!! Couldn't be happier. So I've only picked up 4 colours of the Collection (because mucho dinero!) but I'm very happy with my selection, very autumnal, if I do say so myself (except for Purple Palazzo Pants...obviously)!

OPI in Tiramisu For Two (Venice Collection)

OPI - Tiramisu for Two (Venice Collection - Autumn 2015)

Now although I'm not a particular fan of the dessert (don't like coffee) this colour is divine! I would definitely describe it as a light pinky-toned latte coloured creme (staying with the coffee theme here). It's right on the line between a light beige and a light dusky pink...gorgeous! 

The Collection came out with 3 neutrals: Be There in a Prosecco, I Cannoli Wear OPI and this one. Since I already own My Vampire Is Buff, I really did not feel the need to buy Be There in a Prosecco; they are pretty much identical colours. And since I'm not a big fan of white on my nails, as you will know from my Top 5 Summer Nail Polishes post, I Cannoli Wear OPI didn't tempt me either; it pulls way too white for me, even though most would describe it as a very light grey. Furthermore, I was really hoping for Tiramisu for Two to be a dupe of Barry M's Gelly Hi-Shine in Lychee, which although way cheaper takes forever to dry and I always get, without fail, smudge marks on my nails. Although slightly pinker, Tiramisu for Two fits the bill (for comparison swatches, go to the bottom of this post)!  

APPLICATION

- 3 coats (no base because swatch), could get away with 2 if you want a less gel-like finish, but opacity is pretty much perfect at 2 coats (small streaks but not that noticeable).

Formula is quite thin on application, so it has a tendency to pool in the cuticle region, but it evens itself out upon drying and leaves no visible pool line (dries quickly). The thinness of the formula also means it's quite streaky on the 1st coat, but it's very opaque, so it's not that awful combo of sheerness & streakiness that needs infinite coats of nail polish. Again, you could get away with just 2 coats if you don't mind barely noticeable streaking. But it gets its lovely shiny, almost gel-like, finish at 3 coats.


OPI in Purple Palazzo Pants (Venice Collection)

OPI - Purple Palazzo Pants (Venice Collection - Autumn 2015)

This is a beautiful lilac colour. I was very reluctant to purchase this one though, not because it's not very autumnal, but because looking at other peoples' swatches I thought that it would look too similar to a polish I already own...Essie's Bond With Whomever (comparison swatches below). And indeed they are very similar (think Essie Mint Candy Apple and Blossom Dandy similar), however Purple Palazzo Pants pulls a bit pinker and warmer than Bond With Whomever (more blue-toned), so if you are a fan of lilac on your nails then I would say get this one, but if you already own Bond With Whomever then I think you can afford to skip it.

APPLICATION

- 3 coats (no base because swatch) this has the same application as Tiramisu for Two but maybe a bit streakier and a tiny bit less thin, you couldn't really get away with 2 coats for this one though (visible streaking). It also has the same pooling effect as Tiramisu for Two which disappears when dry. Lovely shiny gel-like finish.


OPI in Worth A Pretty Penne (Venice Collection)

OPI - Worth a Pretty Penne (Venice Collection - Autumn 2015)

Some have described this polish as a coppery foil, but I find the colour to be way more rose gold. I think the silver micro-shimmer pulls what could have been a very coppery polish to a more neutral "delicate" colour with a pop of je ne sais quoi! This colour was definitely the one I was looking forward to the most from the Collection (along with Baroque...But Still Shopping!) and far from being disappointed (which is usually the case when you have such high expectations) I was pleasantly surprised! I would describe Worth a Pretty Penne as Designer...De Better's ginger little sister (for comparisons, go to bottom of this post), I love it!

If you buy one colour from this Collection make it this one, you won't be disappointed! Plus, unlike some from this Collection (cough cough...Gelato on My Mind and Purple Palazzo Pants, cough cough), it is a conventional Autumn colour (from the rust category).

APPLICATION

- 2 coats (no base), it could be a one coater if you don't mind a lighter colour and seeing a bit of the nail line. At 2 coats it reaches full opacity (the extra coat doesn't deepen the colour by much). 

This one also has a thin formula (something I notice quite often with OPI polishes compared to Essie ones) but not as liquid-y as the cremes above, but I think that's because it's more of a metallic - so an easier formula to manipulate and hence no pooling.

It has a slight dull finish, but the metallic shine gives it all the glamour it needs. The metallic component of this polish also means that it gets some brush stroke marks. This could be avoided by sponging on the last layer; however, I personally find it so minimal I really wouldn't find it necessary. Plus, the brush stroke marks make the polish look more like penne rigate! Don't think it was intentional though, but it's a nice touch.


OPI in Baroque...But Still Shopping! (Venice Collection)

OPI - Baroque...But Still Shopping! (Venice Collection - Autumn 2015)

This one was the most interesting of the bunch for me, a lot of people described this one as ugly (I don't think any polish can beat Essie's Belugaria in that domain). But this polish texture is exactly what I picture Baroque art and Venetians' luxurious costumes to be like in nail polish format. I just wish that the colour had been a bit more of a yellow gold (reminiscent of gold leaf which was a big thing in Baroque art) rather than the very green tinged silver-gold this is. However, I've seen about three more polishes of this texture in the upcoming OPI Starlight Collection which I have no intention of buying because they are all too silver, and I think once you have one, you have them all.

APPLICATION

- 3.5 coats (no base), you could get away with 2 coats (the metallic base covers completely in two) but there isn't much glitter at two coats as it's very difficult to get on the nail.

It really is a Catch 22 when it comes to the glitter because if you want more on your nails then you have to add a layer, but as you do so, the metallic base covers the previous layer's visible glitter. This is the effect that reminds me of the gold leaf texture, which is perfect when it comes to Baroque, but is very annoying if you just want more glitter. Not to mention the glitter unfortunately sticks to the side of the bottle hence you get false expectations as to the amount of glitter you'll get on your nails.

Furthermore, because it has a metallic base you also get the inconvenience that that generates...brush stroke marks. These brush stroke marks unlike for Worth a Pretty Penne are difficult to deal with especially when you're also trying to get the glitter "evenly" distributed on the nail. Contrary to most glitters you can't just fish and dab them on as it leaves very odd brush marks in the metallic base.

So I've described how difficult this formula is to work with so here is the technique I use to get the results you see in the pictures:

  • 1st coat: Get the base on and don't worry about the glitter yet

  • 2nd coat: Deepen the base and start getting bigger chunks of glitter on the nail by fanning out the brush (pressing on the brush a bit harder than you normally would) to "scrape" the glitter off the brush whilst still getting straight brush stroke marks

  • Repeat step 2 until satisfied with glitter deposit, be careful each new layer covers previous layer's glitter hence my 3.5 coats since the 0.5 was where I adjusted a bit to get a more even glitter distribution.

Now for the positive aspects of this polish:

It's a fast dryer (as it's a metallic) and it's one of the easiest glitters I've ever had to remove. No soaking required, just put remover on tissue or cotton pad leave on nail for 20 seconds them rub off and repeat once. Remove last bits and edges with an ear bud soaked in remover. This polish, unlike many glitters I've encountered (cough cough...Essie's Luxeffects...cough cough), doesn't scratch and damage the surface of the nail when removing. I think this has a lot to do with the metallic base the glitter is submerged in, which acts as a buffer between the scratchy glitter and your nail. So great removal although not as easy as a creme, it's still a glitter after all.

So as the name would suggest this really is a high maintenance polish to apply, but I think it's definitely worth it! But it's up to you whether you think this colour and texture is worth the effort. Plus, if you are waiting for an alternative from the OPI Starlight Collection, now you'll know how to apply it ;)

OPI Venice Collection Comparisons

So there you have it, my selection from the OPI Venice Collection, long time coming "n'est ce pas"!

Have you picked up any polishes from this Collection? If so, which ones?

What do you think of this new texture/formula that is the Baroque...But Still Shopping! nail polish and OPI's new obsession with it?

If you're not a nail polish addict, have you ever been to Venice and what did you most enjoy from your trip?


xxxemma

Follow

Essie Autumn/Fall Collection 2015

Essie Autumn Fall Collection 2015

I'm a huge Essie fan (as if you couldn't tell from my last polish post) and I'm in love with this new Autumn release. Well except the blue one, I don't know what it is but I'm just not a fan of dark and navy blues on my nails. However, I can never get enough of the mints and baby blues! So I'm sorry that this post won't feature Bell-Bottom Blues (not liking the 70s fashion revival either, so it's probably fate), but I'm not going to buy a polish I'll never wear, also Color Binge nearly didn't make it either, but more on that later.

A little disclaimer, I have colour corrected/brightened my photos when I saw fit, to better represent the actual colour on my nails and not the weird morphed version the camera can sometimes create. Hope you guys don't mind, I've tried to make them as accurate as possible.

Essie in Color Binge (Autumn Fall 2015)

Essie - Color Binge (Autumn/Fall 2015)

When I first set my eyes on this Autumn release, I did not pick up this colour. Why? Because I don't tend to gravitate towards reds, I like them on my nails, don't get me wrong! But I already have an orange based one (Essie - Red Nouveau), a blue based one (Mavala - Paris) and an unusual one/coral (Maybelline - Hot Salsa, as talked about in my previous post) so I just didn't feel the need for another one. Plus looking at other blogs, no-one thought that this was a particularly unusual or must-have red! So I didn't think anything of it, picked up the other four, you see in the pictures, and went on my merry way.

One month later, we were lucky enough to get this release in Belgium pretty simultaneously to the lucky girls in the US, so quite early on. There I am, browsing Pinterest, and I see this image of the perfect red manicure holding an Autumn leaf and now I'm really craving a bright/fresh orangey red. This is where Color Binge comes in, I went back to my local Di (our beauty shop chain in Belgium) looking for "that" red. I considered Clambake but I just couldn't get past the name (it really grosses me out for some reason, why couldn't it be called Lobster For Two or something...nope that also grosses me out and I like seafood). So Color Binge it was (I didn't pick up Fifth Avenue because it's too similar to Red Nouveau) and no regrets! It's the perfect juicy fresh red I was looking for, a bright poppy colour some might say.

APPLICATION

- 2 coats (no base as swatch), could be a 1 coater if you fancy more of a jelly finish. As it is quite jelly-ish you can still see a bit of the nail line after 2 coats but nothing too noticeable. Beware though because it's quite a liquid formula and I found that a lot of excess comes on the brush but wiping said brush twice (once on each side) before application should prevent major flooding from occurring. Other than that; lovely formula, really glossy finish (hence the juicy effect).

So all in all, well done Essie, for mind reading/releasing a colour I would be craving this Autumn without even realising it, until half way through it (Autumn starts 1st of September in my nail calendar)!


Essie in With The Band (Autumn Fall 2015)

Essie - With The Band (Autumn/Fall 2015)

I love this colour, it's a touch darker than In Stitches, I would describe this as a dusky brick red, i.e. a red with a lot of brown in it. However, I was not impressed with the longevity of this one. I applied this before bed ready to photograph it the next morning (I had lost my daylight at this point), next morning comes and I see 2 chips, not impressed at all (I obviously filled them in for the photo) but I would have to test again with a base coat this time and see how it fares. So for me this is the chipper of the bunch :/

APPLICATION

- 2 coats (no base), could be a 1 coater. Smooth, easy to apply, quick drying. Lovely plastic-y finish, here we go again, gel finish Emma...gel finish! Such a shame about the chipping but I'm sure if you use a base and top coat you should be fine. I personally never use a top coat unless I want to change the finish of a polish, because I don't like the amount of coats I end up with on my nails. So all my photos will never have a top coat (which mean you will see the accurate finish of polishes I swatch).


Essie in Leggy Legend (Autumn Fall 2015)

Essie - Leggy Legend (Autumn/Fall 2015)

This was the colour I was the most intrigued about from the Collection, because it just screams Autumn to me. But I was disappointed, nothing to do with the formula (no chips) it's just too brown? For my liking, I don't know, I haven't pinpointed why I don't like it as much as I thought I would...too bronze? Really don't know.

APPLICATION

- 2 coats, dries way matter than the other polishes from the Collection. Very easy formula could be a 1 coater. It has a slight pink shimmer that the camera hasn't really picked up, mind you it's very discreet, so not surprising.


Essie in Frock'n Roll (Autumn Fall 2015)

Essie - Frock'n Roll (Autumn/Fall 2015)

This one is a tricky one to describe, it looks like a black creme with silver micro-shimmer in the photo. But when you look closer you realise it's actually a very dark aubergine colour with said silver micro-shimmer. The photo on the right gives a better idea of the hint of aubergine you get from this polish; the thumb and upper left corner of the bottle being the prime examples. It's very pretty, and by far the most unique colour of the Collection. If you were to pick up one colour from this Collection, I would make it this one (if you like your darks that is) mind you, the next one is also my favourite, so it's up to you and what you look for in your polishes ;)

APPLICATION

- 2 coats (no base), could be a 1 coater. Easy to use with a great formula, no patches/sheerness on application, nice glossy finish.


Essie in In The Lobby (Autumn Fall 2015)

Essie - In The Lobby (Autumn/Fall 2015)

When looking at other peoples' swatches online, this was the one I was the most excited to own. It your stereotypical Autumn shade though and unfortunately because it has a more difficult application than the other ones in the Collection you end up with a lot of coats which makes the polish quite dark on the nail. The end result is very similar to when I apply Revlon's Vixen, if you own that one, I don't think you need this one too (also very close to Bahama Mama when wearing multiple coats).

APPLICATION

- 3.5 coats (no base) a bit patchy, some nails needed more coats than others to get an even opacity on all nails, hence the 0.5 because some needed 4 and others were good on 3. But unfortunately, this means you can't really get the lightest colour from the bottle and it ends up looking almost black on the nails (which I'm not a fan of). It's the same problem I've noticed with Soulmate, in every swatch I look at online the opacity differs on every nail, I have yet to see a perfect swatch of that polish, hence why I refuse to buy it even though it's a staple amongst many personal Essie Collections.

But where the opacity of this one fails the longevity is amazing (I've noticed that too, with other Essie polishes). When I apply 3 or more coats of my Essie polishes, they last a lot longer with no chips, than many of my other polishes. Which is contrary to the prevailing belief/knowledge that the more coats you apply, the more likely you are to get chips. Still on the upside, this polish has a lovely glossy/gel finish which I really love, and which has meant that I've already worn it twice as a full manicure. But as I've only just recently bought Color Binge and I'm craving a brighter colour; I have a sneaking suspicion this will be knocked from that pedestal pretty quick!


So there, you have it, which one was your favourite from this Collection? 

Which one have I tempted you to buy? 

What other Collections are you most looking forward to this year?

I'm still waiting on the OPI Venice Collection to finally make it to Belgium. OPI has definitely got to up its game when it comes to release dates outside of the US and UK, I'm afraid. Because Essie has it going on, I've already purchased one from their Winter Collection, which is from their Cashmere Matte range (I know the US got it over a year ago, but the UK hadn't).


xxxemma

Follow

Top 5 Summer Nail Polishes 2015

Having not yet ventured into the world of neons, this is as bright as I go!

While I know it's no longer Summer for those of us living in the Northern Hemisphere, some parts of the world have yet to rise and shine to the occasion... who am I kidding, I'm really late on this one! However, as I'm still seeing the polishes in store (I'm mainly talking about Essie's Summer Collection here), I thought I might as well talk about them, plus Southern Hemisphere peeps...I got you! So without further ado, here we go: 

Maybelline's Super Stay in Hot Salsa

Maybelline's Forever Strong Super Stay - Hot Salsa

What is Summer without the Classic Red? Well my friends, this one ain't it! This is such a unique take on the Classic Red, you'll be doing repeat manicures before you know it (in Summer 2014, this was all you could see on my nails)! Lo and behold, Essie came out with a very similar colour (some might say identical) in this year's Summer Collection, called Sunset Sneaks. Now although I love the colour, I could not justify spending more money on a colour I already own. As a nail polish addict, this is my one Golden Rule; "Thou shalt not buy repeat colours...unless thou really hates the formula" :P

So let's talk about this beauty shall we? It's a very hard colour to photograph as the camera definitely picks up more red than there is (certain lights do that too when on the nail). I would personally describe it as (and bear with me here) a milky neon, dark coral-ly red.  The thumb nail, I think is the most accurate here (as is the picture of the bottle in the thumbnail of this post). Haha, thumb nail, thumbnail... moving on :D

APPLICATION

- I used no base (because swatching), and did 3 coats, mind you I could have made it in 2 if I wasn't so fussy. It has a lovely shiny plastic-y finish... some might also call that a gel finish (but it's not a gel, so it doesn't need any UV lights) :P

The formula of this range from Maybelline is fantastic, for me it survives my hair washing experience (which some might describe as heavy-handed). However, I don't think I've done the full 7-day test on this formula yet, simply because my manicures only ever stay on my nails for 4-5 days (so many colours and so little time!). But I do recall, whenever I take this off, I'm taking off a perfect manicure, with no chips, every time!

The only thing I dislike about this polish (there's always something) is the brush. It's MAHOOSIVE!!! Now I know some people like a bigger brush - I'm just not one of them. The idea is that you only need one or two strokes per nail, but if you're like me, and you like your entire nails covered (yes, I flood my cuticles... naughty, naughty) it can become a big mess, very quickly! But as I always paint my nails before bed, by the time I've washed my face, in warm water, in the morning, the excess on the skin generally comes off pretty easily. The end result is what you can see in the photo above.

Maybelline's Super Stay in Pink in The Park

Maybelline's Forever Strong Super Stay - Pink In The Park

This is the "palette cleanser" of the bunch and not I'm not talking sorbets here (well I am kinda...same idea). When you've been wearing a lot of bright/over the top colours, which is generally what Summer entails, it's nice to have a more neutral "palette cleanser" in the bunch. Now I know for most this would be Essie's Fiji, but it's just too pale for me (yes nice and opaque) but I'm someone who really doesn't like white on my nails (nor black for that matter). I know that might be slightly controversial to some, since for so many nail polish addicts, white is an "essential" for Summer. However, this is not to say I don't love Fiji, I just love wearing it more come January. My Summer neutral just has to pack a bit more of a punch (I love colour even when I want a cleanser) and for me Pink In The Park is the perfect in-between; not too plain, but still a nice touch of calming colour.

APPLICATION

- Again no base, but this took 4 coats for full opacity, unfortunately it's quite sheer/streaky, that effect you get when it doesn't apply evenly (opacity-wise) on the whole nail. But again, lovely plastic-y finish (let's just go with it) and chip-resistant.

I would also highly recommend Essie's Muchi Muchi (ok by now you can probably tell I'm a big Essie fan) it's a smaller brush...thank you Nail Polish Gods!!! Mind you, they could make it a bit thinner, I really would not be against it :P

Some of the more eagle-eyed among you may have realised that I've broken my Golden Rule. Yes, Muchi Muchi is a very similar colour to Pink In The Park. BUT, and here is why I added the "formula" clause to my Golden Rule, I much prefer the Essie one; smaller brush (i.e. less mess) and opaque in 3 coats, if I remember correctly. However, it also suffers from the sheerness/streaky problem, just not as much.

Essie in Chilato

Essie - Chilato (Summer 2015)

Speaking of "palette cleansers" and sorbets, let me present Chilato! This was the standout shade of the Collection for me (not formula-wise, just colour-wise). It's a gorgeous milky, pale yellow lime. I would not describe it as just a pale yellow, because it doesn't have enough warmth to it (red) to be in that category. You really get a sense of cold from the colour (like a gelato...get it? Get it? OK everyone got it!) and I think this is due to the slight tinge of lime (green) in there.

APPLICATION

- This one I did wear with a base (Essie's Grow Stronger), because I was just too excited to paint my nails with it, even with the many warnings about the formula from fellow nail polish addicts. It took 4 coats for full opacity (same sheerness/streaky problem again), and I suffered from major bubbling (which yay for photoshop! because it looked like I had sand on there). I hope that was just due to the heat (we had a surprisingly hot couple of weeks here in Belgium), or my lack of patience when it comes to letting polish fully dry between layers; by the time I've painted all 10 nails, I start at the beginning again with the next layer. Mind you, I am quite meticulous/slow so it's not like it has only been drying for 5 seconds. The brush was weird on this one too, rather thicker or wider than the normal Essie brushes (it fanned out weird), and it did become quite messy, quite quickly. 

But I had been warned before purchase about the difficulty of the formula, so I really didn't mind as much. It's such a unique colour and so refreshing (get it?... OK I'm leaving it alone now) I would say don't be put off by the bad formula reviews (even mine), the colour alone is worth it!

Essie in Saltwater Happy

Essie - Saltwater Happy (Summer 2015)

I was distraught (OK that might by a sliiiight exaggeration...let's say mildly unhappy) in the beginning of the Summer because one of my favourite blues, Maybelline Forever Strong in Ceramic Blue, had dried up and gone all gloopy. This is not something that tends to happen to my polishes as I keep them out of the sunlight in a cool dark place (i.e. in the drawer), which I highly recommend for storing polishes.

Now, I could have gone out and bought a thinner, but as this never happens to me and the polish was quite old and barely had anything left (yes, I loved it that much!) I just was going to buy a new one.

So there I was, innocently browsing the Boots International website...and...it's not there. I REPEAT, it was not there! Now instead of going into full Mayday! mode and looking for old stock online, I had seen Lily Pebbles talk about Topshop's polish in Blue Rinse, which looked like it could be a dupe. But while patiently waiting for my travels to the UK (where I could go to Topshop) which at the time was still a month away, the Essie Summer Collection 2015 came out, and "Miracles Happen" (once in a while, when you believe! You now probably have that song stuck in your head... you're welcome!) because Saltwater Happy was the exact blue I was looking for. Basically, take from this very long-winded story that: Maybelline's Ceramic Blue, Topshop's Blue Rinse and Essie's Saltwater Happy are dupes.

APPLICATION

- In this photo, I was wearing a base, with 2 coats, could be a one-coater (depending on how fussy you are). Plus, I was already three days into the manicure, so a very chip-resistant formula. And wait for it...yes, you guessed it, a lovely plastic-y finish.

But I wasn't going to make the same mistake twice, so I bought a back-up! Because I know I wasn't going to get that lucky twice! Brush-wise, like Chilato, I feel that it was slightly thicker or wider. But unlike Chilato, the formula is a breeze, so the width of the brush isn't such a problem; plus, it's nowhere near as wide as the Maybelline brushes, so basically a win, win for me, YAY!

Revlon's Top Speed in Jaded

Revlon's Top Speed formula - Jaded

I'm not sure if you can still find this colour in the range, but Bourjois have this exact shade in their So Laque Glossy range ("yes" to plastic-y finishes) in 04 Amande Défilé. Now, although my love for Essie polishes should be undisputed by now, my introduction to them was less than stellar. My first ever polish from them, 4 long years ago, was Mint Candy Apple; and any nail polish addict knows the fuss around this colour. So I was expecting to be wowed, but sadly it was not the case (formula was good, not as excellent as some of the ones I have today, like Splash of Grenadine). What I didn't realise at the time, was that the European Mint Candy Apple had already been reformulated from the US version (which was the one everyone raved about), and with that came a slight change of colour. On my nails I find that Mint Candy Apple just pulls too blue for me, and that's not what I expect from a mint, same with Blossom Dandy - too blue. This is very odd because when you put the bottles side-by-side to Revlon's Jaded, they look very similar. However, Jaded pulls way more green and is slightly lighter in colour, which is exactly what I expect a mint to be.

Before Jaded however, I had found this exact shade in the Marks and Spencer's own nail polish line (before they repackaged to their current awkward round bottle, they had a similar shape to the Maybelline bottle, which was way easier to put in a drawer). Sadly, after I worked my way through two bottles (I was obsessed with the colour and they were the only ones producing such a colour at the time, plus they had the amazing plastic-y/gel finish before it flooded the market), they repackaged and discontinued the colour. They really did have an amazing range of colours and formulae, I want to say 2009-2011'ish, and I couldn't understand why more people weren't talking about them. But all good things must come to an end, I guess. But back to Jaded:

APPLICATION

- 4 coats in the photo, unfortunately it was rather gloopy because it's rather old. Nothing a thinner couldn't solve, I'm sure. But in the meantime, I still have my Bourjois Amande Défilé to work my way through. Oh and I love the brush; thin and perfect! Revlon have some of my favourite brushes on the nail polish market. Also, plastic-y finish, can you tell that's my favourite?


Well there you have it, my top 5 nail polishes and colours of the Summer season. Hope you enjoyed and it wasn't too long-winded for you guys.

Let me know what your favourites were? 

And if you're in the Southern Hemisphere, what you're looking forward to wearing the most?


xxxemma

Follow